Original Link: https://www.anandtech.com/show/8582/msi-z97-gaming-5-motherboard-review-five-is-alive
MSI Z97 Gaming 5 Motherboard Review: Five is Alive
by Ian Cutress on October 6, 2014 10:00 AM EST- Posted in
- Intel
- MSI
- Motherboards
- Z97
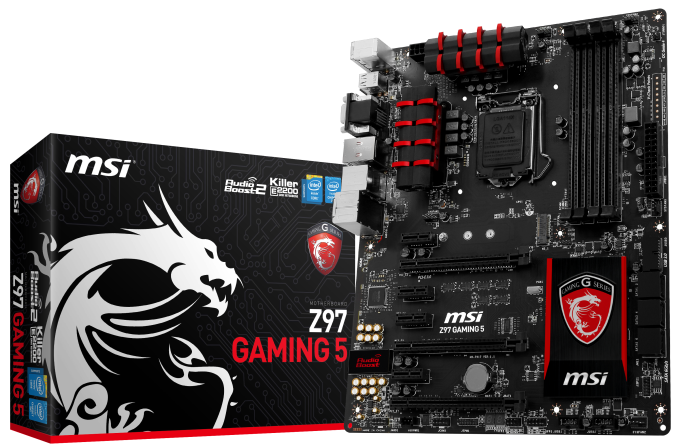
Sometimes it feels odd to review the cheaper elements of the motherboard market. The more expensive models have more to play with, whereas the sub $160 market for Z97 comes down to the choice of an individual controller or two. Here is where brand loyalty and styling seem to matter more than absolute feature set. To make matters worse for MSI, one of the other manufacturers is also branding their motherboards with ‘Gaming X’, making it harder to forge that nomenclature as a brand. Today we are looking at the MSI Z97 Gaming 5 at $160, which at the time of writing is sold out on Newegg.
MSI Z97 Gaming 5 Overview
One of MSI’s main focus points of the last twelve months has been style. This typically means fashioned heatsinks, almost-invisible traces and if possible a reduction of on-the-board components (trying to balance price as well). MSI wants its motherboards to be shown off, rather than hidden inside a case, such that other users can show it off to their friends and perhaps entice them into a similar build. The Gaming 5 aims to the more cost conscious Haswell build while still maintaining a full ATX size in the red and black livery featuring the MSI Gaming logo.
On the gaming side of the hardware equation the Gaming 5 is fitted with a Killer E2205 network port which comes with application prioritization software, as well as an enhanced Realtek ALC1150 audio solution via Audio Boost. For users with USB DACs there is a feature to offer enhanced power to a pair of USB ports as well to improve power signal quality. There is also M.2 support for 22x42mm to 22x80mm devices up to PCIe 2.0 x2 speeds, and all the fan headers onboard are 4-pin.
One of MSI’s positive points of late has been the BIOS and software combination, which for the gaming range is boosted by a six-month premium subscription to XSplit. The box also contains a door hanger to let people know you are gaming and an MSI Gaming case badge to affix to the build.
Performance at stock is a bit of a mixed bag. We get a good array of CPU results due to MSI’s aggressive MultiCore Turbo, along with low idle power consumption and DPC Latency, but MSI’s tri-annual USB speed bug rears its head again. POST times are also longer than expected, being north of 14 seconds in both stock and stripped mode. Despite our audio tests also performing poorly, MSI has informed us of a driver update that should improve performance.
The best point of comparison for the Gaming 5 will be the Z97 Guard Pro at $110 we reviewed previously. Compared to the Guard Pro, the Gaming 5 gets SLI support, Killer NIC over Realtek, ALC1150 over ALC892 audio, HDMI rather than DisplayPort, support for 3 full-length PCIe devices, more rear panel USB ports, more in the package and perhaps a nicer looking product overall. This amount might be a sufficient difference to account for the $50 upgrade, although whereas the price of the Guard Pro might suit a Pentium build, the Z97 Gaming 5 really indicates a good i3 or i5 build.
Visual Inspection
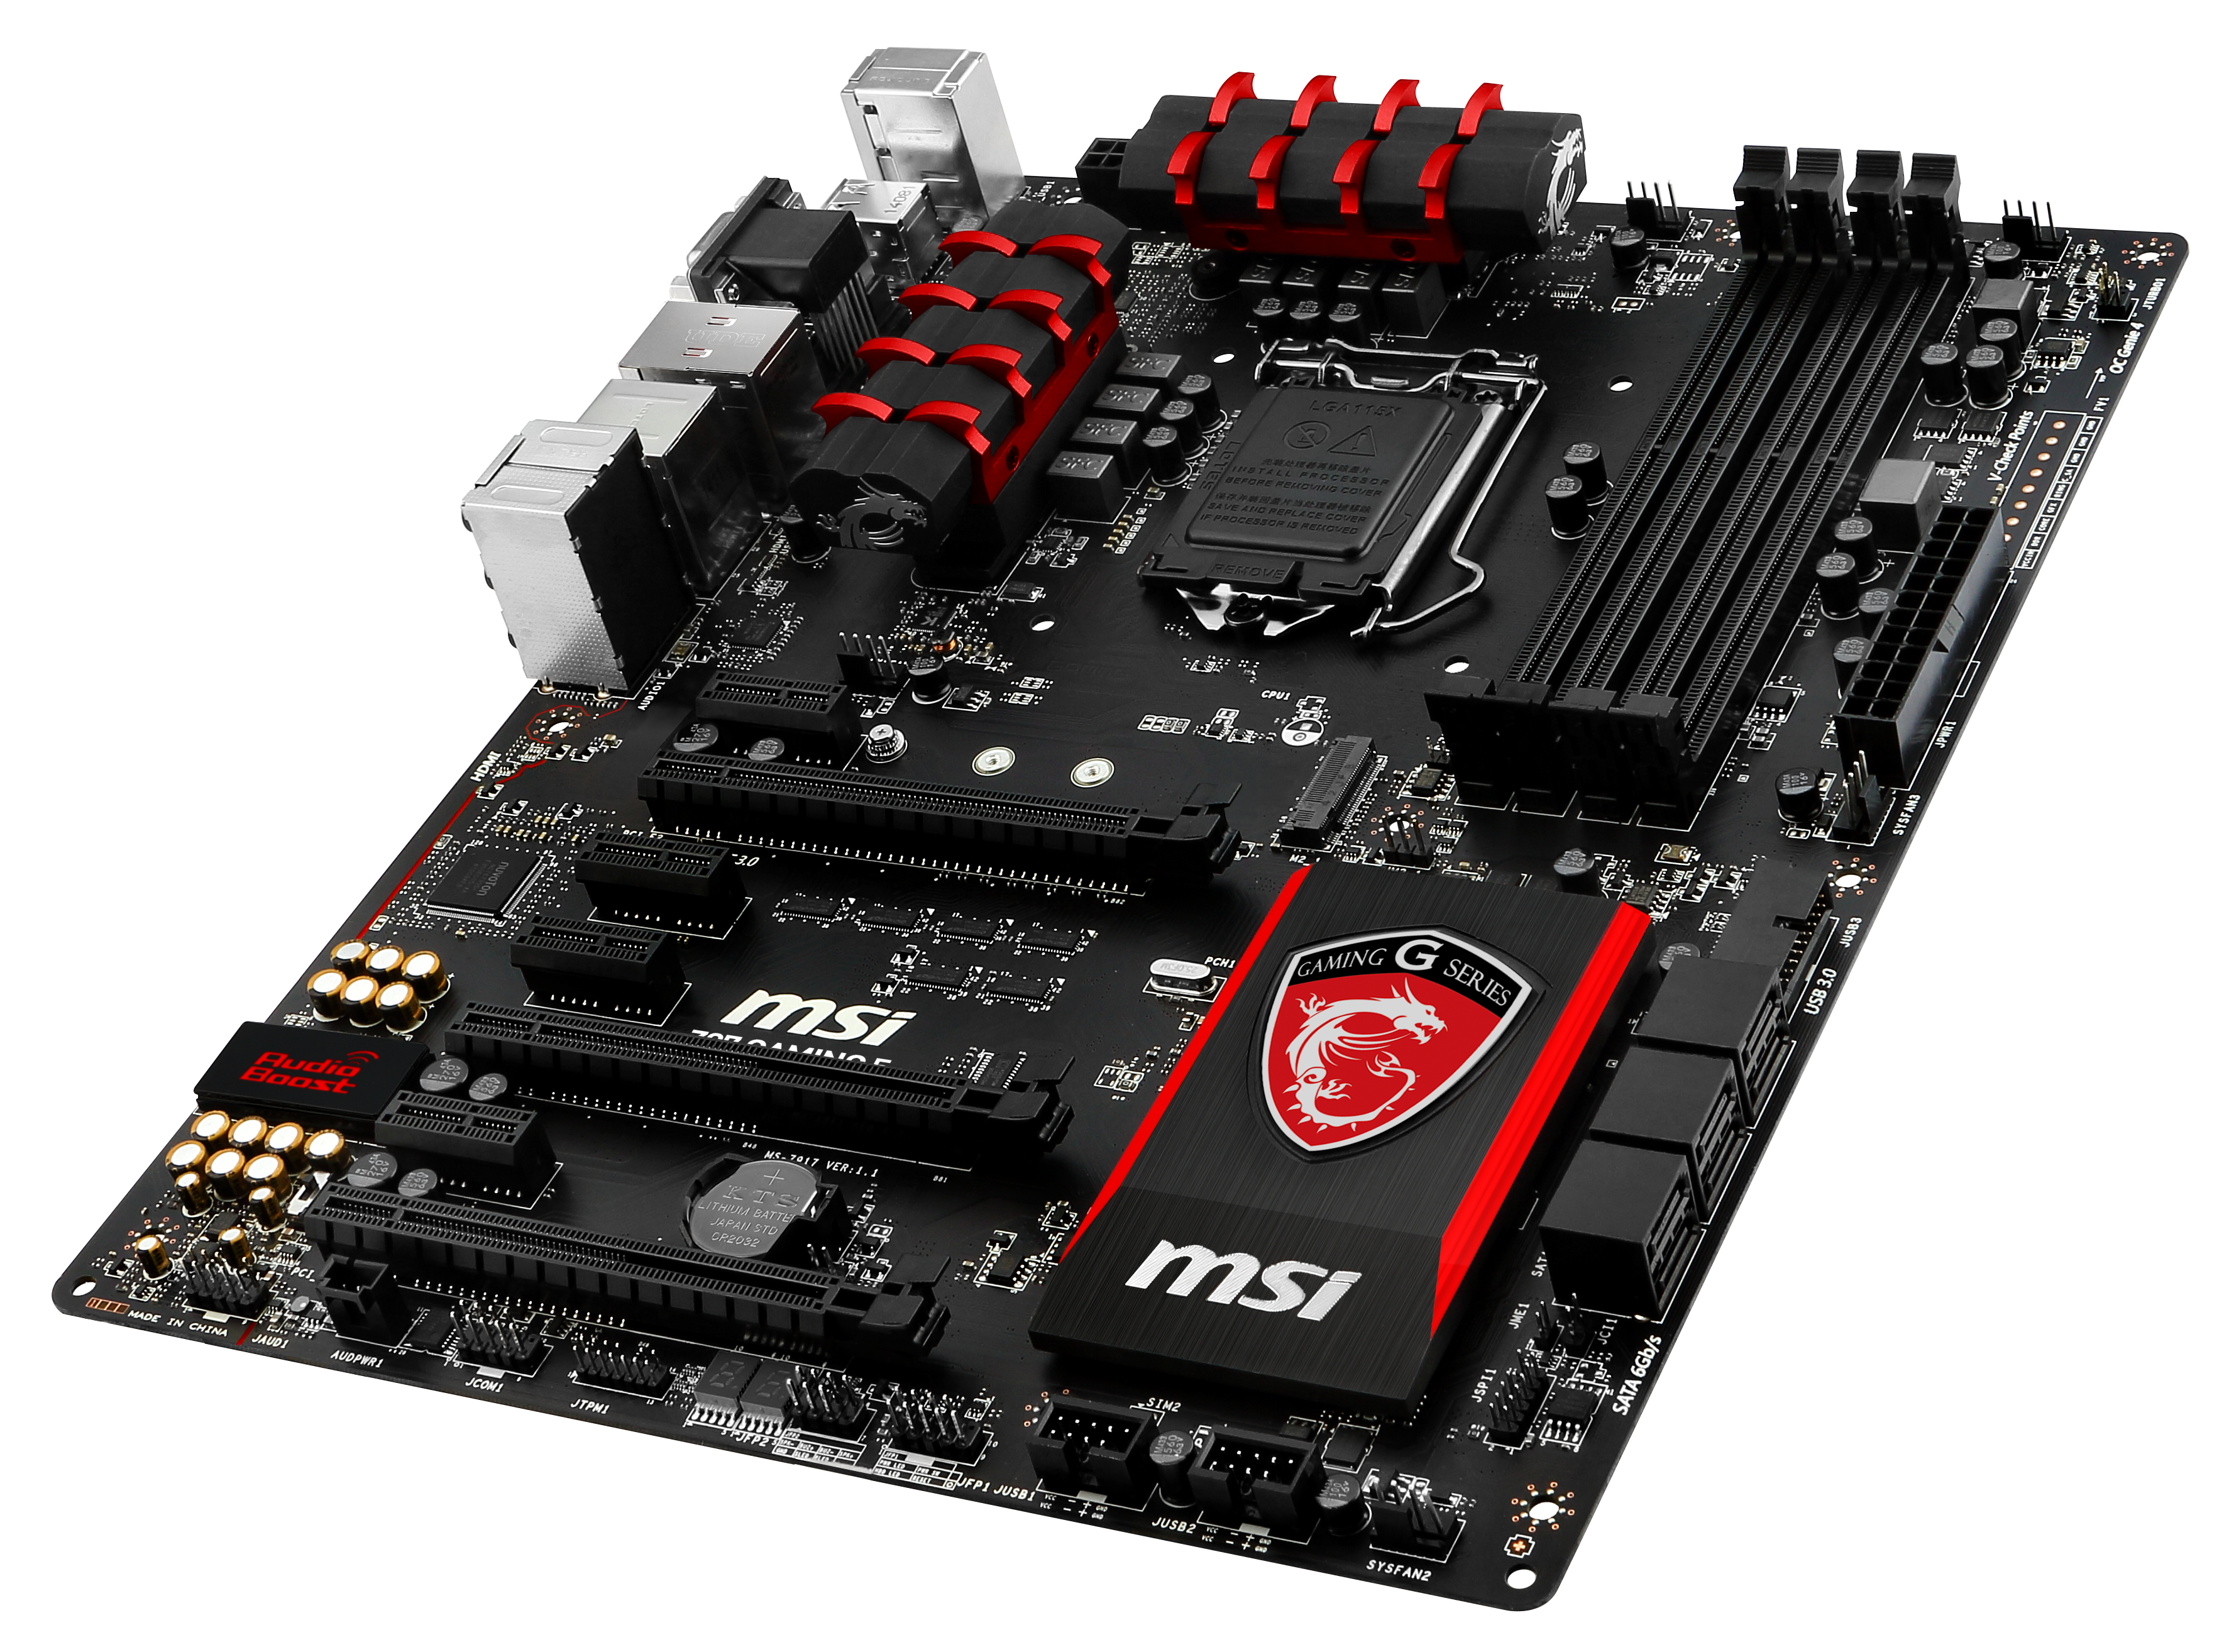
One of the first things I noticed about the Z97 Gaming 5 is the PCB, especially in the socket area. MSI would seem to have a knack for making a PCB look polished, especially on these lower end models where there are fewer components. Like other gaming ranges, MSI uses a red on black theme here, with the heatsinks being the main source of red on the motherboard. The slots and port connectors are all in black, and even the power delivery chokes are an off gray as to not interfere with the general look.
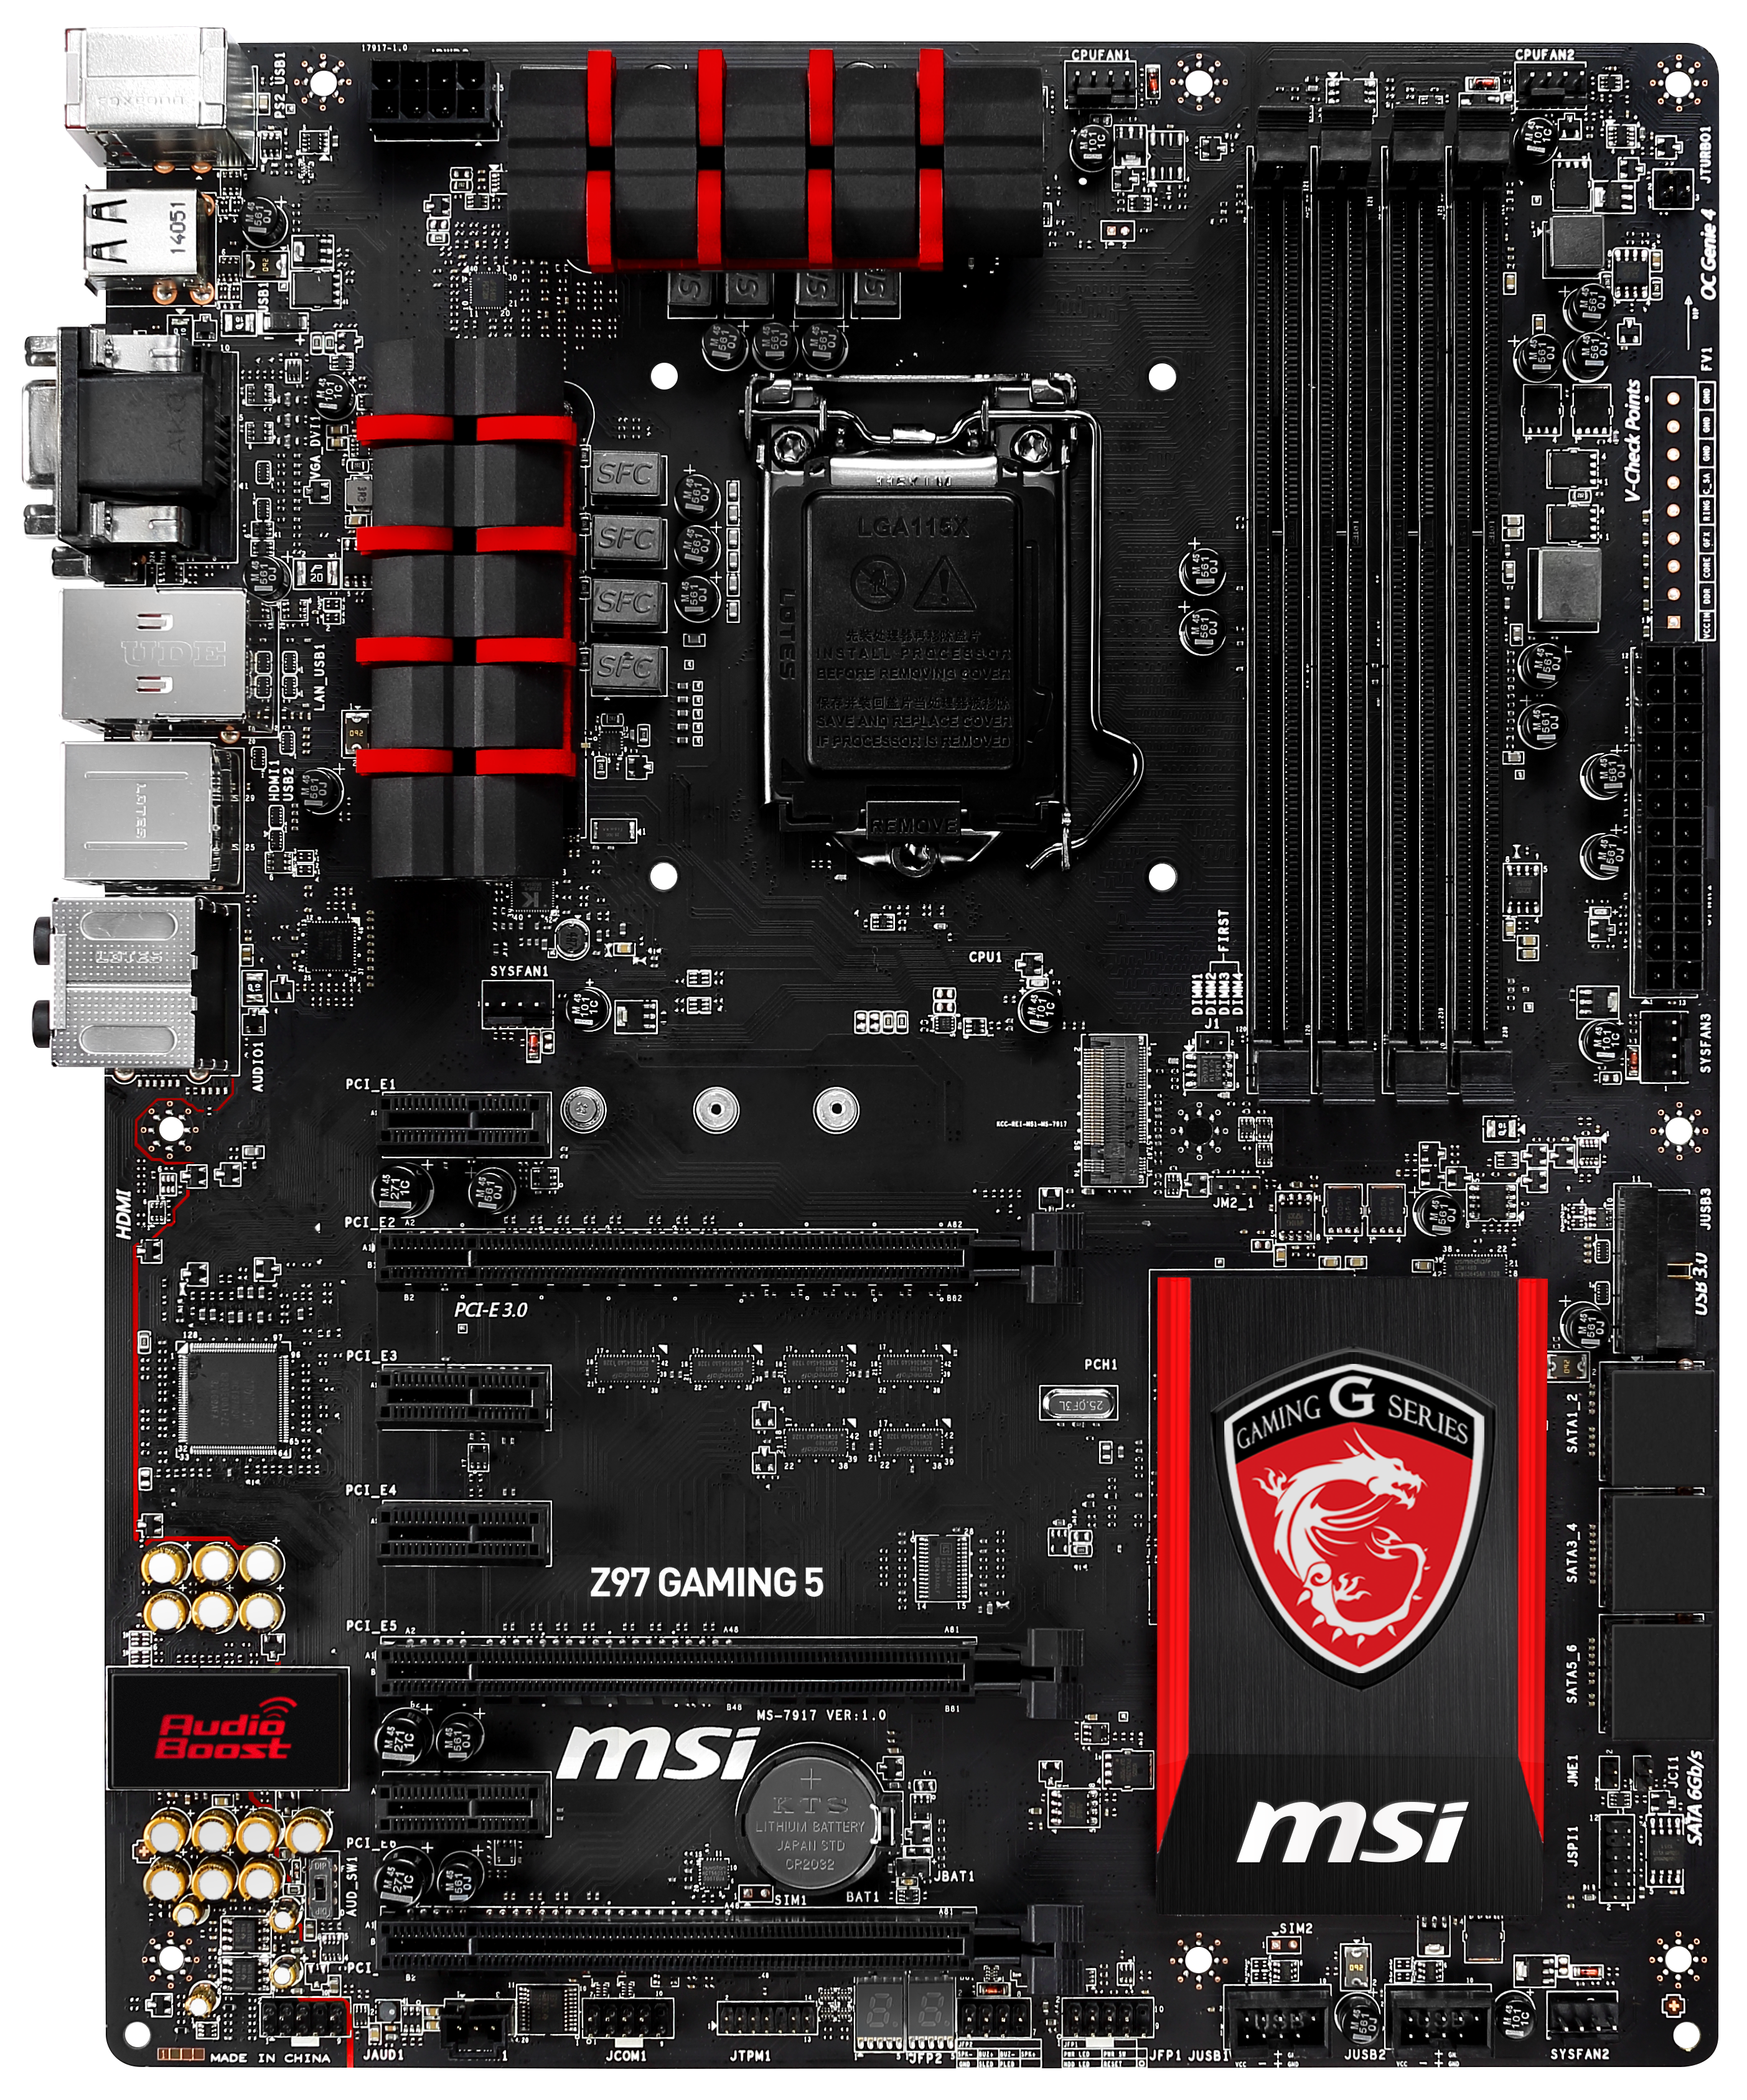
The power delivery heatsinks use an odd surface area design and are not conjoined by a heatpipe, but feel sturdy enough for four phases each. The socket area is not outlined by the typical white box denoting the Intel minimum distances, although we had no issue fitting our CPU heatsink here. The socket area has access to four fan headers – two CPU headers to the top right, one SYS header just above the first PCIe slot and a final one below the 24-pin ATX power connector. The other fan header is at the bottom right of the motherboard.
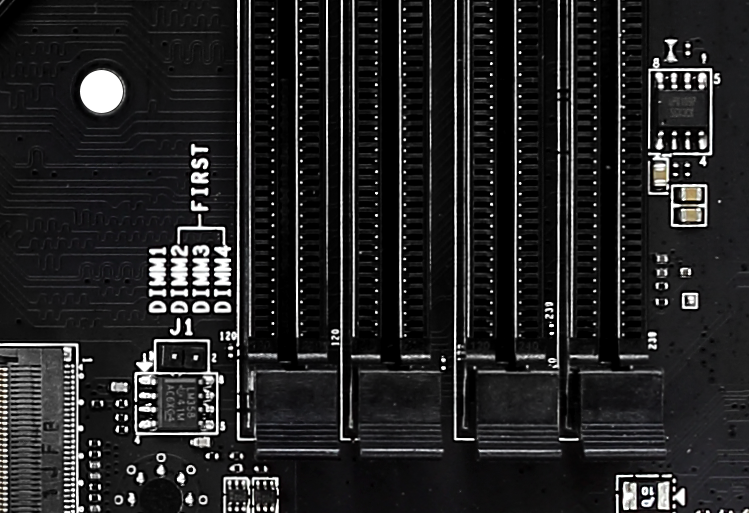
As the DRAM slots are not color coordinated to indicate to users where to install the first memory stick, MSI puts in a handy diagram on the motherboard.

On the right hand side of the motherboard are the voltage check points. This is more of an overclocker tool, hence MSI has only placed pads here rather than an easier-to-use molded array with bundled connectors. Further down the board is the USB 3.0 header which MSI has placed at right angles to the motherboard to align with the SATA ports but also to not get in the way of any PCIe devices.
MSI uses the six SATA 6 Gbps ports from the chipset, all of which are RAID 0/1/5/10 capable. SATA_5/6 share bandwidth with the M.2 when the M.2 is in SATA mode, so there is a small amount of mental juggling to perform when installing storage. This is despite M.2 is still a few quarters away from mainstream sales. Note that there is no SATA Express, perhaps indicating that SATAe should be reserved for the more expensive produce on the shelf.

The bottom of the motherboard has the front panel headers, two USB 2.0 headers, a TPM header, a COM header, and an interesting addition as the ‘Audio Power’ header. One of MSI’s features is better USB power – this uses a bundled adapter and a 4-pin molex to drive a fresher 5V signal into the USB on the rear panel to give a power signal with less jitter. The concept being that it would benefit USB Audio users for better signal transmission.

The PCIe layout of the motherboard uses x16, x8/x8 and x8/x4/x4 when the full length slots are in use, with four x1 PCIe slots from the chipset added in for good measure. Note that if a device is installed into the bottom PCIe slot then SLI will not work, as the first two main PCIe slots will then run at x8/x4, and SLI needs x8/x8 minimum to work.
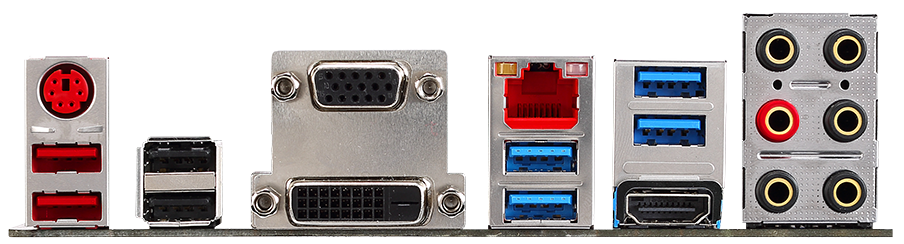
The rear panel is a main focus for some of MSI’s gaming features. On the far left are a combination PS/2 port and two USB 2.0 ports, with these USB 2.0 ports being part of the ‘Gaming Device Port’. MSI’s marketing materials say that with 3x more gold in the connector, the port is more responsive and has a 10x longer lifetime. While the latter statement is most likely true, the first statement is dubious – more gold would mean less impedance for signals, although without overriding software to increase the polling rate I doubt it would do anything for responsiveness.
Elsewhere on the rear panel we get another two USB 2.0 ports, VGA/DVI-D/HDMI video outputs, four USB 3.0 ports, the Killer E2205 network port and audio jacks with extra gold plating.
Board Features
| MSI Z97 Gaming 5 | |
| Price | US (Newegg) |
| Size | ATX |
| CPU Interface | LGA1150 |
| Chipset | Intel Z97 |
| Memory Slots | Four DDR3 DIMM slots supporting up to 32 GB Up to Dual Channel, 1066-3300 MHz |
| Video Outputs | HDMI (4096x2304 at 24 Hz or 2560x1600 at 60 Hz) VGA DVI-D |
| Network Connectivity | Qualcomm Atheros Killer E2205 |
| Onboard Audio | Realtek ALC1150 via Audio Boost |
| Expansion Slots | 3 x PCIe 3.0 x16 (x16, x8/x8, x8/x4/x4) 4 x PCIe 2.0 x1 |
| Onboard Storage | 6 x SATA 6 Gbps, RAID 0/1/5/10 1 x M.2 x2 M.2 shares bandwidth with SATA_5 and SATA_6. |
| USB 3.0 | 6 x USB 3.0 from Z97 (one header, four rear panel) |
| Onboard | 6 x SATA 6 Gbps 1 x M.2 x2 1 x USB 3.0 Header 2 x USB 2.0 Headers 5 x Fan Headers 1 x TPM Header 1 x COM Header Two Digit Debug LED Front Audio Header Front Panel Header Voltage Check Points Audio Power Header |
| Power Connectors | 1 x 24-pin ATX 1 x 8-pin CPU |
| Fan Headers | 2 x CPU (4-pin) 3 x USB (4-pin) |
| IO Panel | 1 x PS/2 Combination Port 4 x USB 2.0 Ports 4 x USB 3.0 Ports 1 x Killer E2205 Network Port VGA DVI-D HDMI Audio Jacks |
| Warranty Period | 3 Years |
| Product Page | Link |
I have seen numerous discussions regarding the good and bad parts of an x8/x8 + x4 PCIe layout against the x8/x4/x4 orientation. Ultimately, I believe the former wins out, due to the fact that tri-Crossfire users are low in number and more likely to go to X99. With x8/x8 + x4 a user can still have an extra PCIe card while maintaining SLI. If a user needs three PCIe x4 cards for their build, chances are at least one of them is not PCIe bandwidth bound, which makes the PCIe 2.0 x4 slot preferred. What MSI has done is use x8/x4/x4, because this frees up the chipset PCIe lanes to be split into four PCIe 2.0 x1 slots. It would be interesting to see a user that has a situation where all those need to be filled.
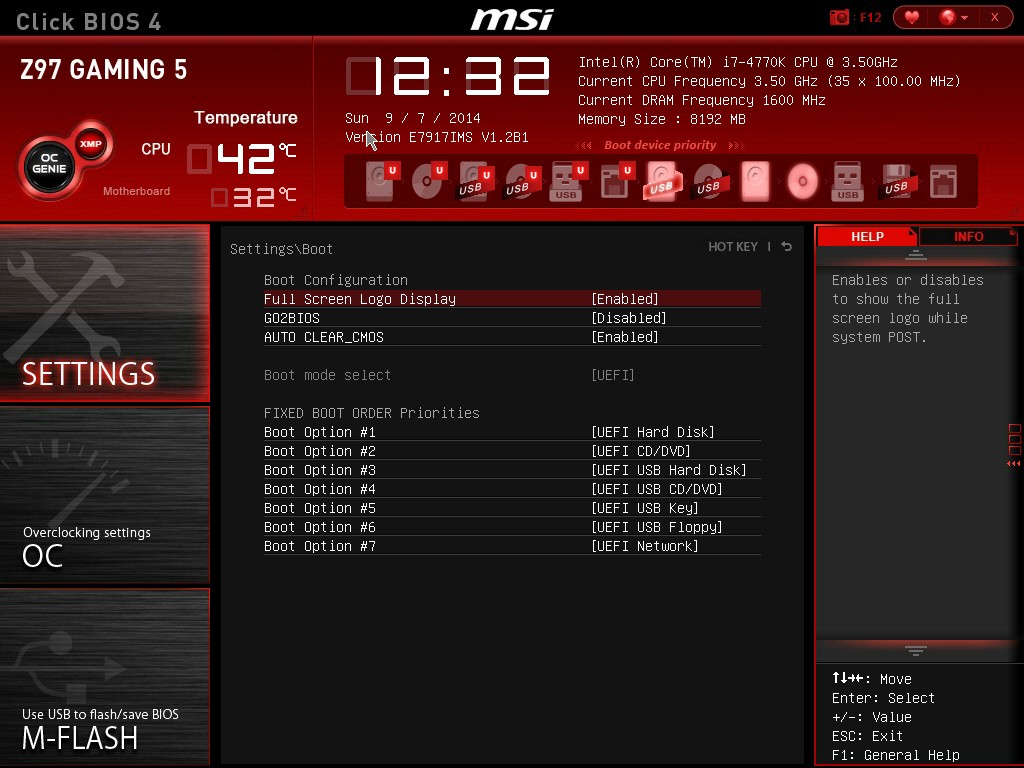
MSI Z97 Gaming 5 BIOS
The MSI Z97 BIOS, as detailed in other Z97 reviews, is a nice step up from Z87. One of the major positives from our first MSI Z97 review, the MSI Z97 MPower Max, was that MSI had taken a large number of our comments about the BIOS from Z87 and Z77 reviews and actually placed most of them in. The Z97 Gaming 5 retails between the Z97 MPower Max and the Z97 Guard-Pro, so it was interesting to find those additions have carried down from the overclocking motherboard to the cheaper end of the spectrum. One of the additions is the easier application of XMP, which now has its own button on the front page of the BIOS:
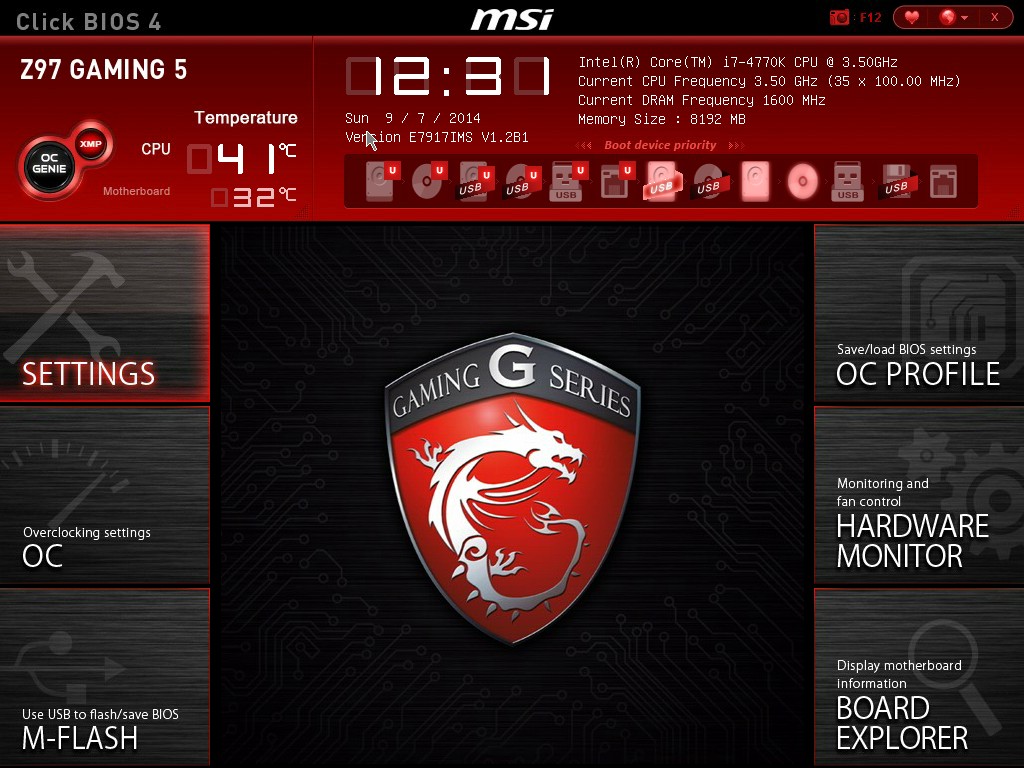
At the top left, along with the OC Genie, is an XMP button. In the past I had noted that enabling XMP on MSI motherboards, especially for users with no BIOS experience, was a minefield due to the (then) disorganized way of accessing memory settings. MSI’s solution is to move it out to this button on the top left, which simplifies things nicely.
The basic layout (as in previous generations) is a top bar featuring the Motherboard name, BIOS version, CPU installed, CPU frequency, DRAM frequency, DRAM size and CPU temperatures. The only real data missing here is voltages and fan speeds, which MSI has moved to a different part of the BIOS. To the left and the right are the main tabs which produce the list of options in the central screen.
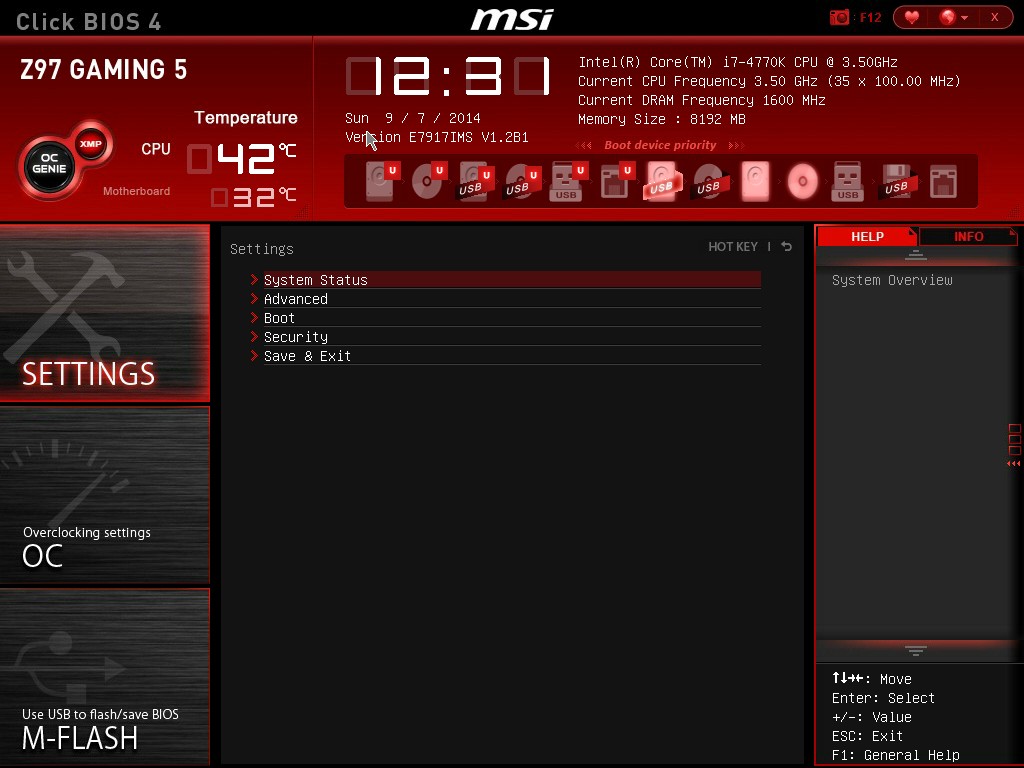
The screen above shows the settings menu with the option selected information to the right of the screen. On this right hand side, users have two options here, ‘Help’ or ‘Info’ – the help screen is shown in the other screenshots down below, but I wanted to draw attention to the info screen which gives the system voltages. I believe MSI has decided to put them here rather than on the top panel to save space but also because of the fact that voltages in the BIOS do not change until the system is restarted. I perhaps would still like the CPU voltage to be placed up the top with the other information, just for completeness and an instant reference.
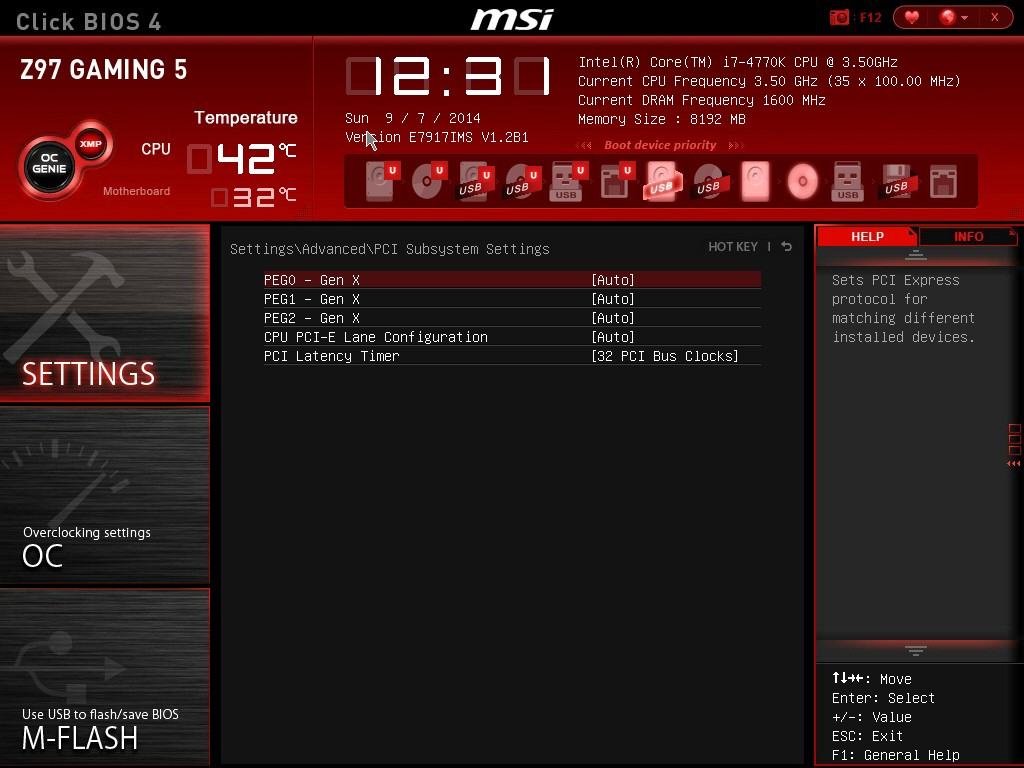
We praised MSI’s FM2 BIOS on the A88XM-E35 as MSI had decided to finally put the path of the options into each page, and here we see the ‘Settings -> Advanced -> PCI Subsystem Settings’ listed above, telling us where in the BIOS we are. I am still glad this is here, because due to MSI’s layout (compared to the other three major motherboard manufacturers) it is not always obvious exactly which menu we are in. Now we can be sure.
Now onto one of the things that I am most proud of MSI for: after several generations of bemoaning the overclock menu for being a hodge-podge of options with no discernable order, it finally has order!
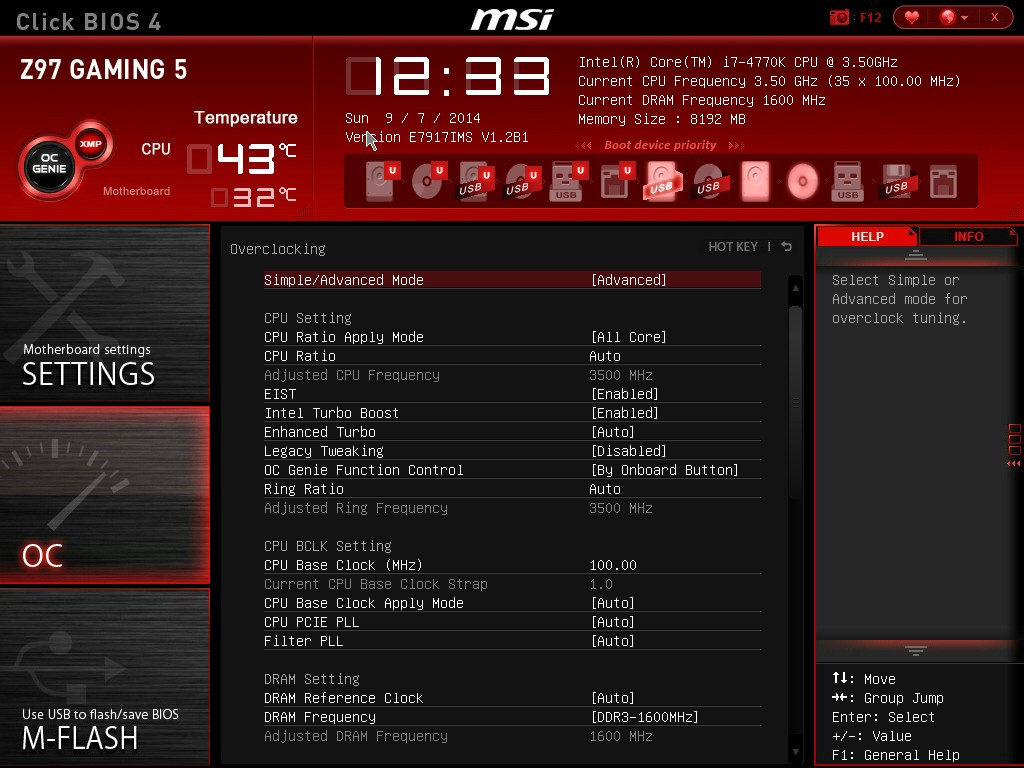
The layout starts with a selection between Simple and Advanced, which enables more options in the menu when Advanced is selected. This is followed by CPU settings, BCLK settings, DRAM settings, Voltage Settings and the ‘Other’ Settings. It could be construed that MSI could hide each of these options behind another menu for each (i.e. selecting ‘CPU Setting’ gives the CPU Setting options), but it all comes down to user preference. Some manufacturers have told me that users prefer long lists of options, whereas others prefer succinct menus.
One interesting feature that I did not expect from MSI is actually the top one in the OC menu. The Simple/Advanced option helps remove/add options that might add an extra element of confusion/expertise to overclocking. Switching over to the Simple option cuts out some of the more harder-to-understand options:
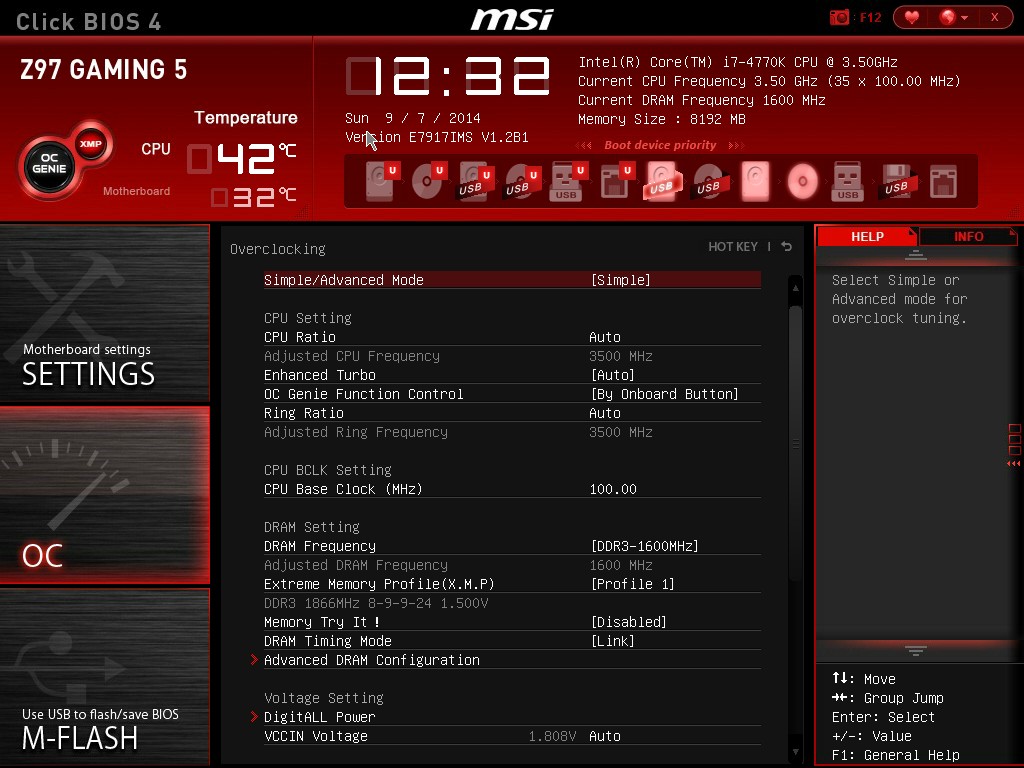
Here we are reduced down to the simple overclock options, such as CPU ratios, Base Clock and DRAM frequency.
With the help section on the right hand side, we get a set of words pertaining to the option selected. The next stage would be the help section to also include the min/max of the voltage range selected, as well as the granularity.
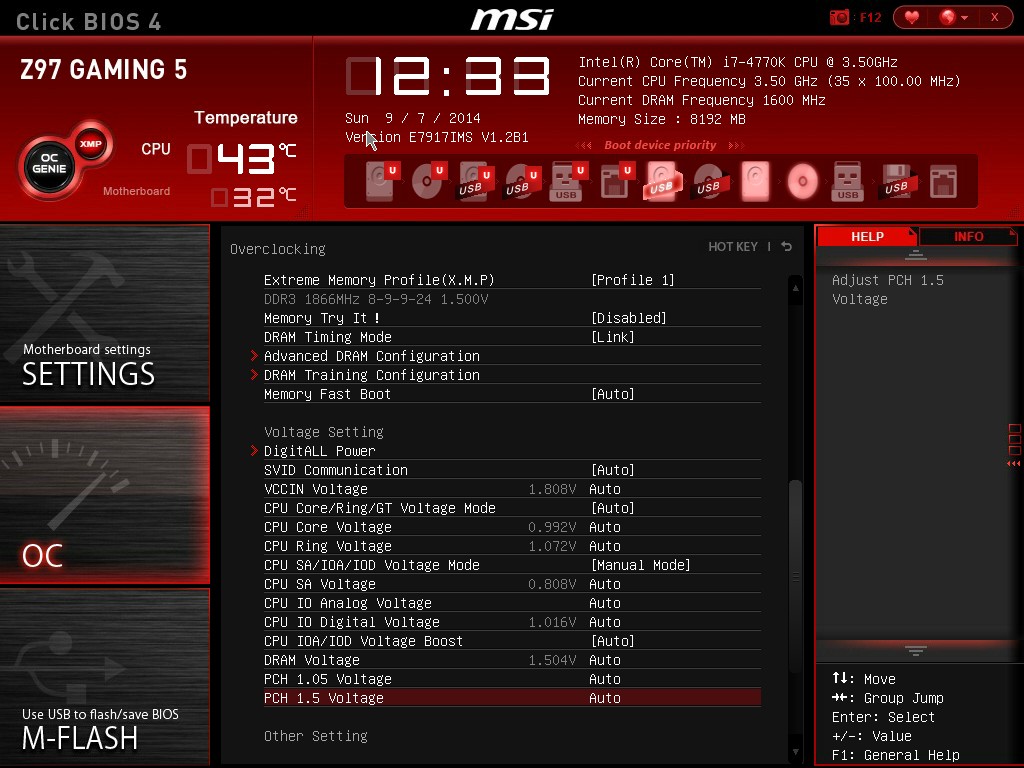
Highlighting a voltage option says almost nothing about the capabilities of the voltage, or how it might pertain to overclocking or stability. Users have to know the intricacies of each option on the fundamental level to understand what difference adjusting a voltage would make. This would perhaps be why extreme overclockers pour hours into studying specification sheets, or hours into trying settings.
Options such as DRAM timing and DRAM Training have not changed from previous generations. The last option is a shame because a lot of the DRAM Training options do not make sense unless you are a DRAM engineer:

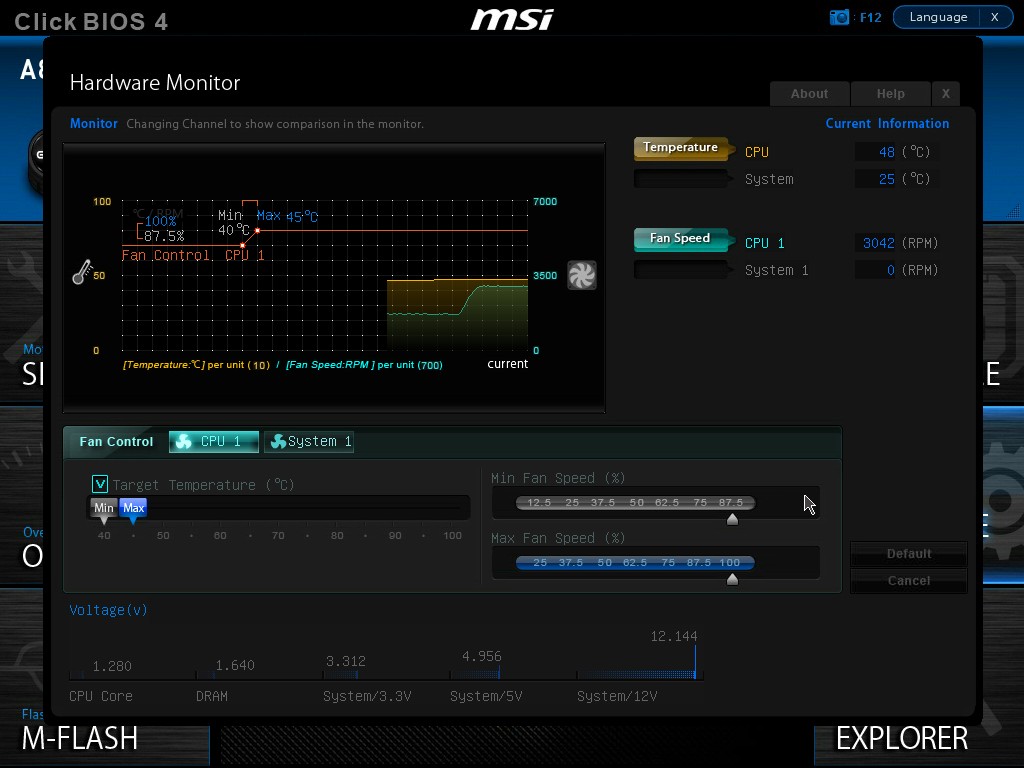
The next feature I want to get to grips with is the Hardware Monitor:
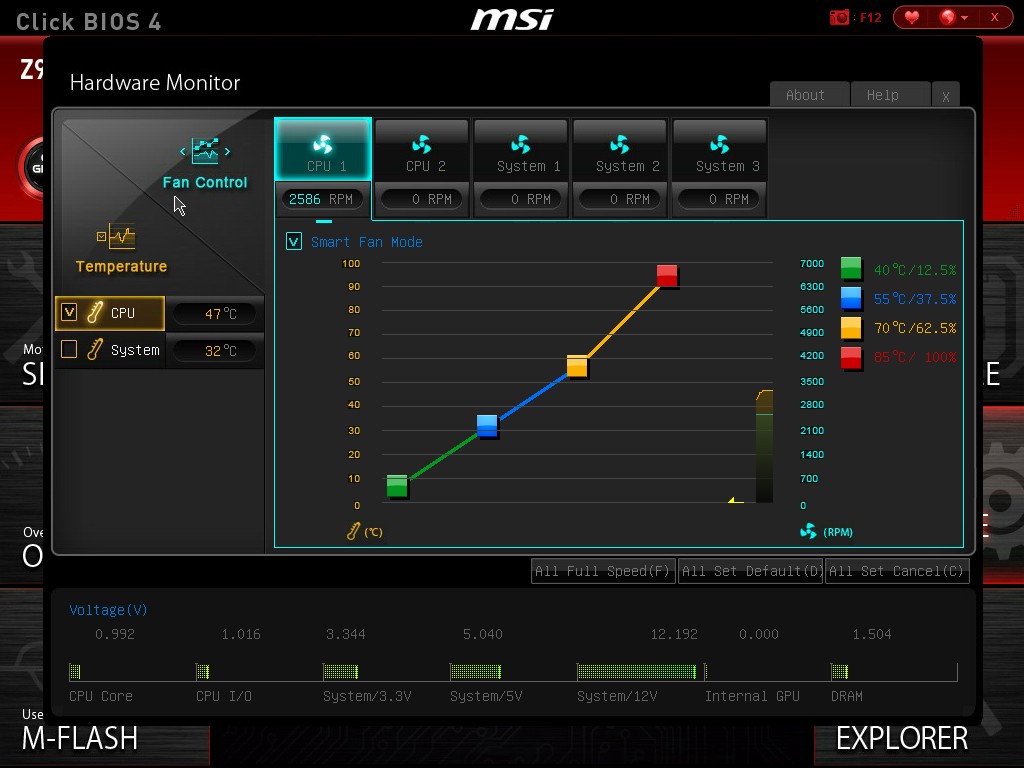
Back with Z87 MSI introduced their first version of the fan selection tool which showed a graph with two points of a gradient. Each of the gradient points was adjusted by sliders next to the graph but not on the graph. My main criticism of this, aside from only having two gradient points, was that the graph itself needs to be interactive. It was good having a graph, giving direct feedback to the user in real time, but the user needed to interact with the graph directly. The new Hardware Monitor is the result of suggestions like this.
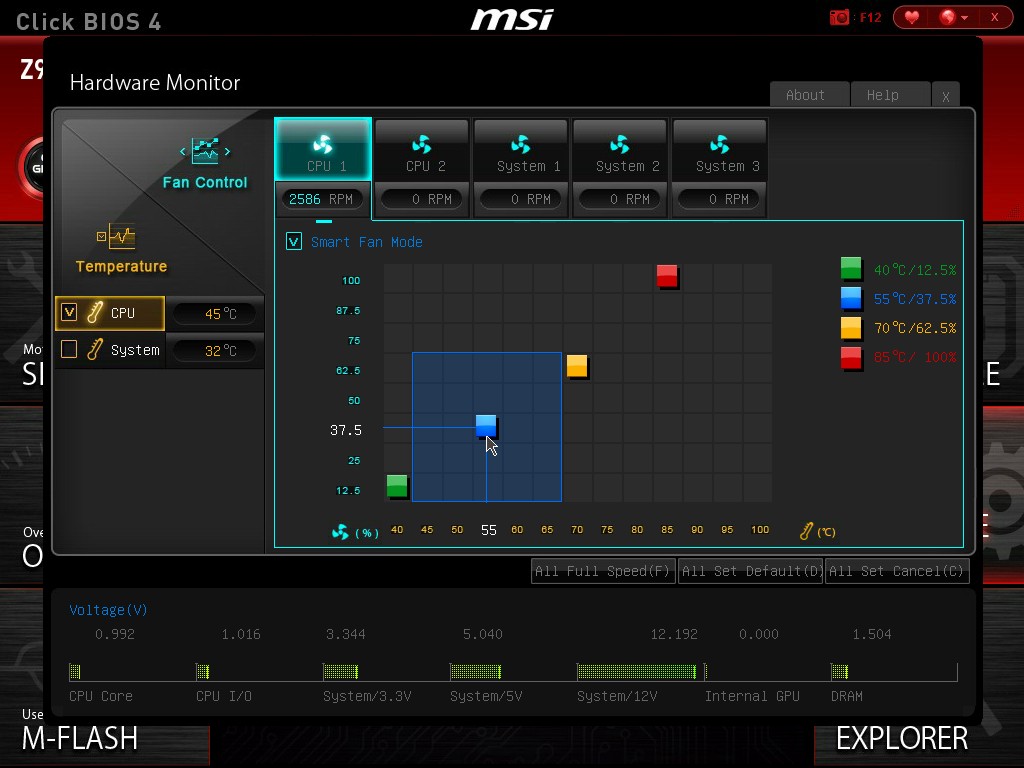
Aside from the increase to four gradient points, each of the points is selectable directly on the graph. The color coordination helps the user to read off the values on the right hand side, and also when selecting to move the points the BIOS shows the valid selections. One could argue about having a negative gradient on a fan (MSI does not seem to allow it), but I like the implementation and style of the fan gradient selection. This is a big step up for MSI in bringing readability and user experience to the BIOS from previous generations.
One issue worth noting is that fan power is not directly proportional to fan RPM. Most fans have a dead-zone <20% power where the fan speed does not change, and above 20% power, more power is more fan speed. ASUS (in BIOS and software), GIGABYTE (in software) and ASRock (in software) are now getting this issue and are implementing the testing routines to do so. Getting them to then adjust the graph to show RPM vs. temperature rather than power vs. temperature is a little harder (it requires some interpolation mathematics which is really easy to do), but this needs to be the next stage in MSI’s fan control development for the BIOS for sure.
MSI still retains the Board Explorer feature, this time it expands into showing which headers are populated.

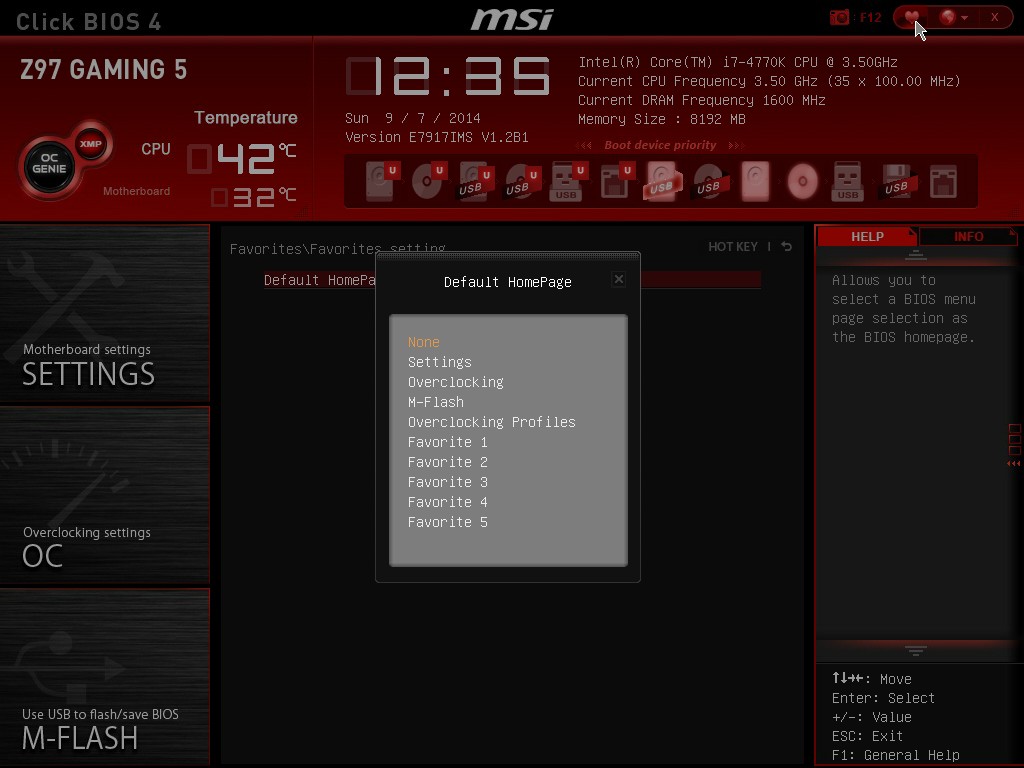
Another new feature to the BIOS is the Favorites menu. This echoes other manufacturers’ efforts in developing Favorites menus, however the MSI implementation was somewhat hidden from view, selectable only by clicking the heart symbol at the top of the BIOS. I would suggest that MSI move it to the Settings menu, which might make it used more.
The Settings Menu allows users to select which screen they want to start on when entering the BIOS:
It might actually be worth MSI using their in house overclockers to create their own Favorite menus, and letting them be selectable from the selection of other menus. Although with the fact that MSI has now ordered the overclocking menu such that the options have some form of order, we might not see the Favorites menu being used that often because the BIOS is now easier to follow.


MSI Z97 Gaming 5 Software
In previous generations, MSI’s software has centered on many different central software themes, the most noticeable being MSI Suite that formed a list of icons at the top of the screen for each element of the software package. Unlike other motherboard manufacturers, each of those software elements was also a separate icon on the desktop, rather than under a central unified interface. With Z97, while each element is still individual, we lose MSI Suite, Click BIOS and Control Center, putting Command Center firmly as the lynchpin in MSI’s software implementation.
Most of the individual software elements for Z97 remain unchanged from Z87; however the installation procedure is different. The driver CD uses a new interface to allow users to select what they want to install, and I noticed that if GPU drivers are not installed, the software will automatically adjust the screen resolution (if it can) to make sure the installer will fit on the screen. Other manufacturers do not do this. One of the downsides of the installer is that Norton Antivirus is automatically selected for install, and it also reappears in Live Update discussed below.
On doing the default install, the driver disk will also install a series of MSI branded wallpapers, just in case you forgot what you purchased:
As mentioned, the main element of software is the Command Center, which due to the motherboard being in the gaming line is black and red.
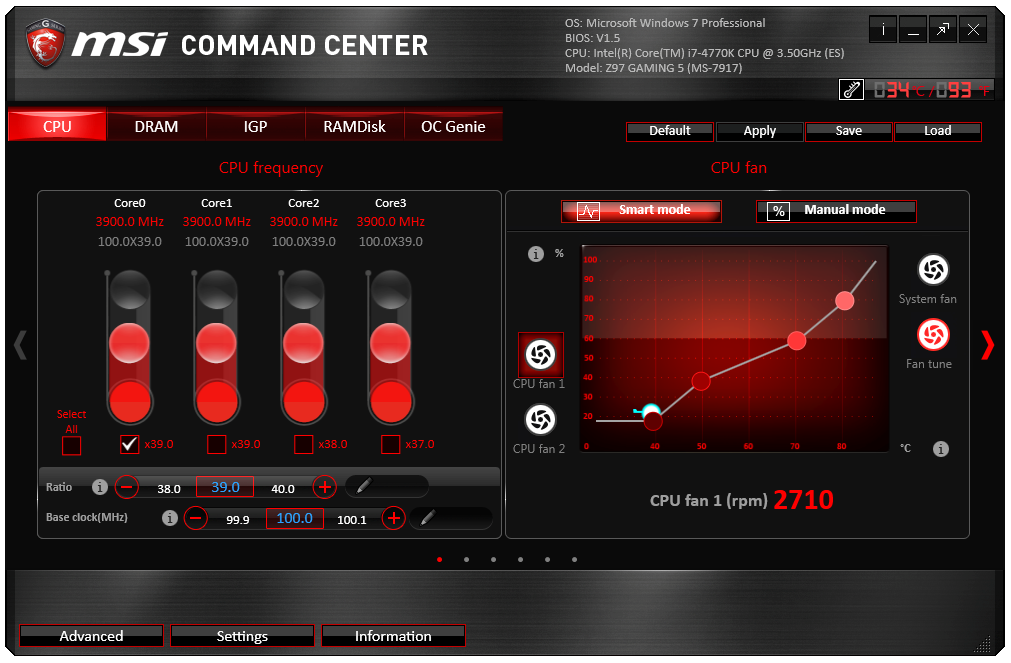
Here is a basic interface for overclocking frequencies of the CPU and the fan controls, with options to adjust each of the fan gradient points as well as the system fans. The Fan Tune option adjusts the fan gradient points to MSI’s suggested points, however the interface is lacking a set of presets (Silent, Default, Turbo, Full Speed) so users can one click adjust all their fans in one go.
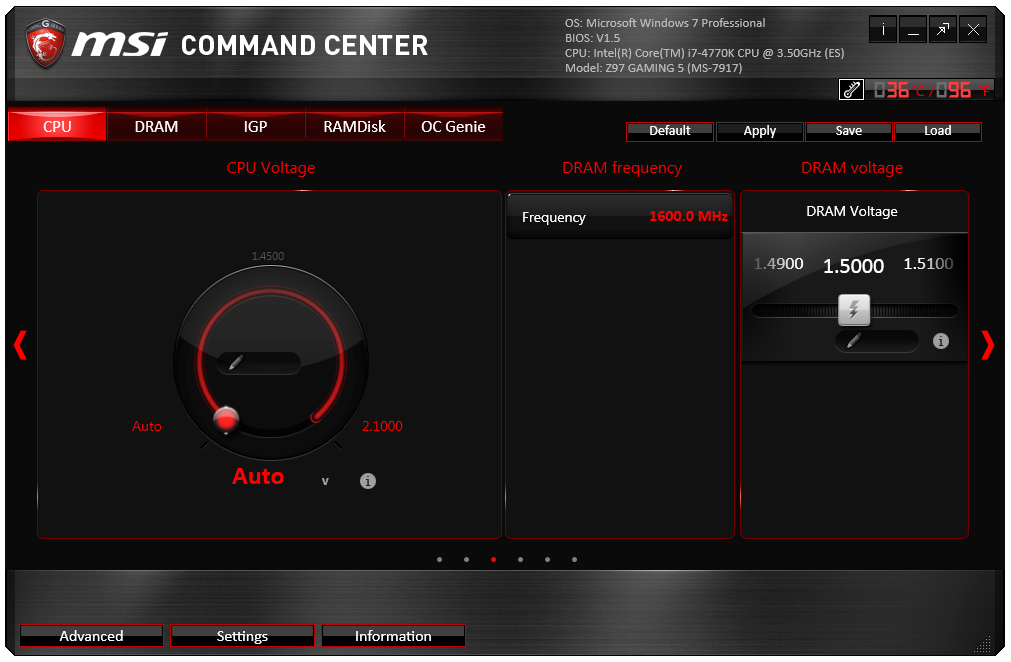
For voltage tuning, the ugly issue with Command Center raises its head again. Here is a CPU voltage adjustment option that goes from Auto to 2.1 volts, making it all too easy to select 2.1 volts! The option stares at you in the face, suggesting it is OK to put that much voltage in a CPU. I have mentioned this to MSI before – this is not on. Extreme overclockers do not need 2.1 volts, let alone regular users, and as such MSI should limit this voltage to 1.40 volts maximum. The only way MSI would open up more extreme voltage selection is if the ExtremeOC option is selected in the BIOS. That is all. Having such a large voltage on display here is a bit crazy.
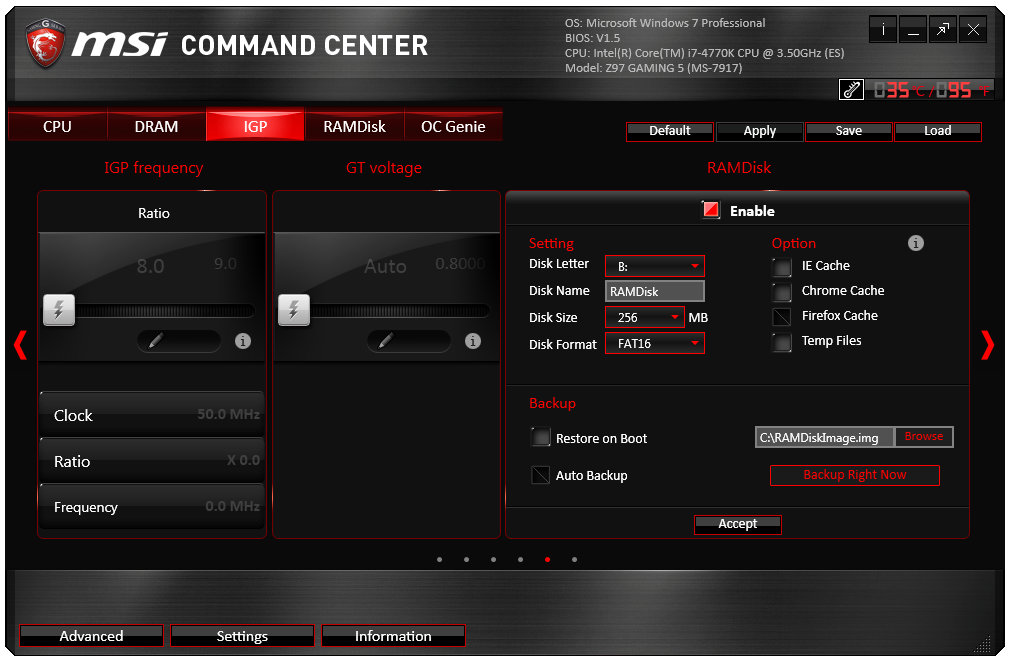
MSI also has a RAMDisk as part of their software, which on our 8GB DRAM installation offered up to 6GB in size. Unfortunately you have to enable the RAMDisk before selecting the size of it (and thus requiring a double allocation), but MSI does offer some quick options (such as temp files) for implementation as well as restoration options.
MSI does offer basic text options to avoid the graphics:
The Mobile Control tool is somewhat hidden away as part of Control Center, the idea being that with an iOS/Android app, the overclocking and monitoring can be performed via a smartphone or tablet.
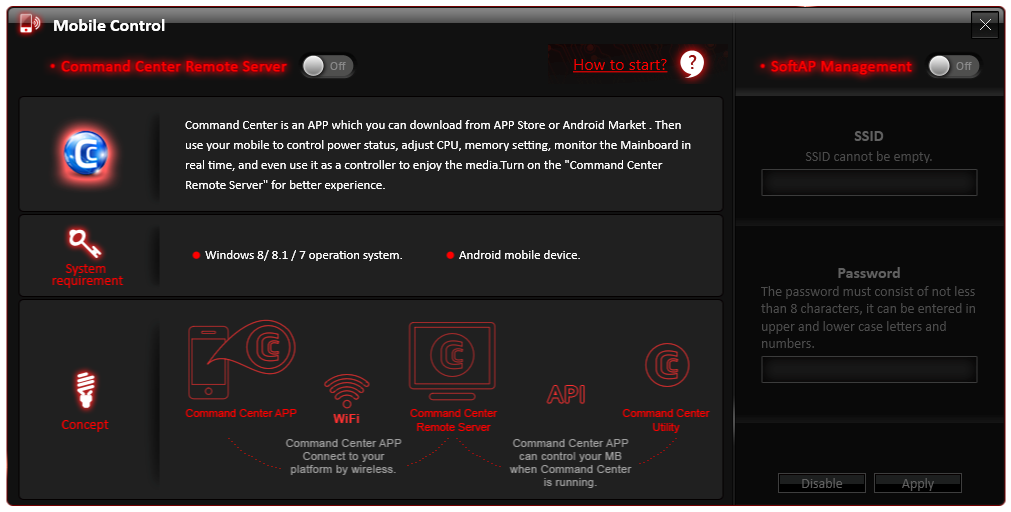
If MSI want overclockers to use this, I would suggest offering it as a standalone application rather than part of the Control Center package, that way users would not have to install bulky software that might affect the efficiency of their operating system installation.
Eco Center
One of MSI’s recent drives has been towards making their products more economically friendly. This means less power draw, and having the ability for users to disable ports and slots that are unused. All of MSI’s motherboards now have this as a marketed feature.
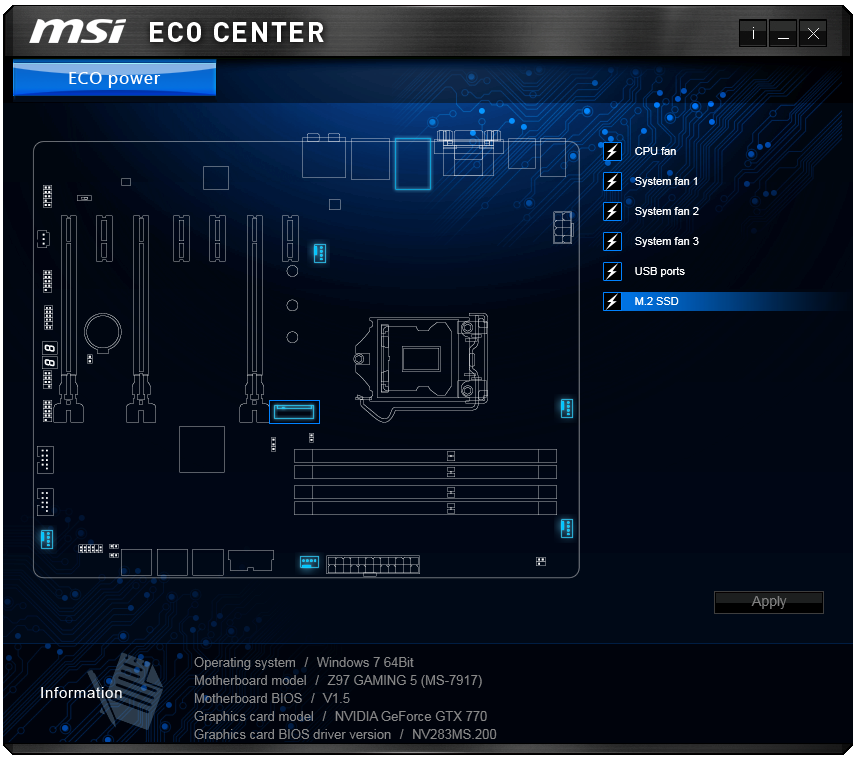
Personally I like the list of information at the bottom, which at least helps identify the system. One thing to add might be a quick calculator to let the user know how much power is being saved. I work on the rough guide that 1W = $1/yr at $0.115/kWh rates, and it would be something simple to add in here.
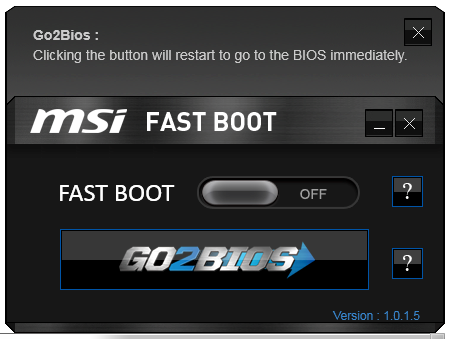
Fast Boot
Now that Windows 8 gives options to boot into the operating system without a chance to enter the BIOS, manufacturers have developed their methods to allow BIOS entry on reboot. Fast Boot encompasses that option, along with Fast Boot options to help the overall boot time of the system to be quicker.
Live Update 6
One of MSI’s best tools in their software package, for a couple of years, has been the Live Update tool. MSI were the first motherboard manufacturer to make and deploy an auto-update tool that worked and was easy to use. Now that the other manufacturers have these tools as well, MSI do not have that unique advantage, however they seem to be taking some suggestions on board.

Users of MSI motherboards might notice that for this new Live Update 6 we can actually see some of the motherboard information, but also the size of downloads. One of my critical points of LU5 was the inability to see how big the audio drivers were before downloading in the event of a restricted bandwidth connection. MSI has now solved this issue.
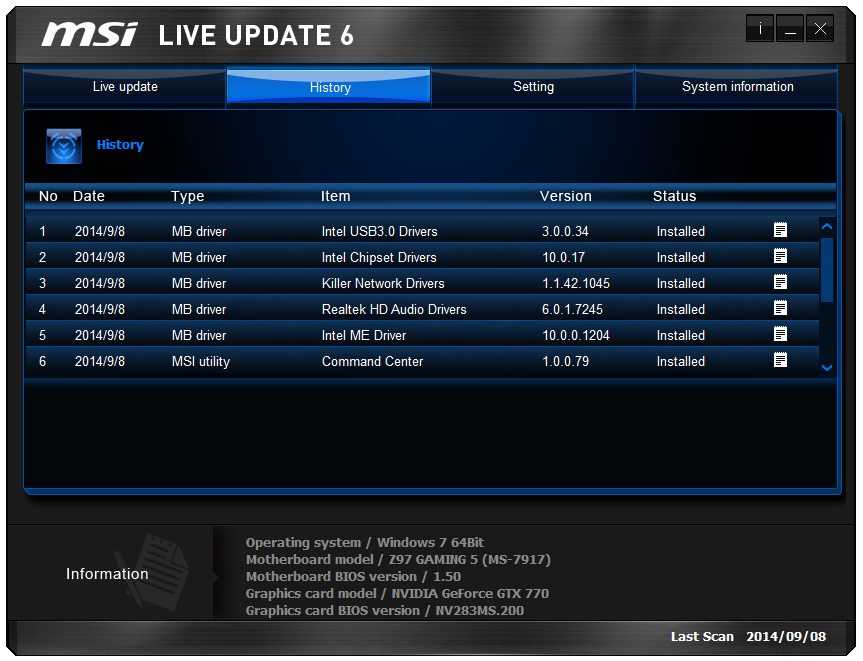
While downloading, the system will also indicate a level of completion while still retaining all the size and version information. It is worth noting that while the other software is themed red and black for the gaming range, Live Update here is in the classic blue and black.
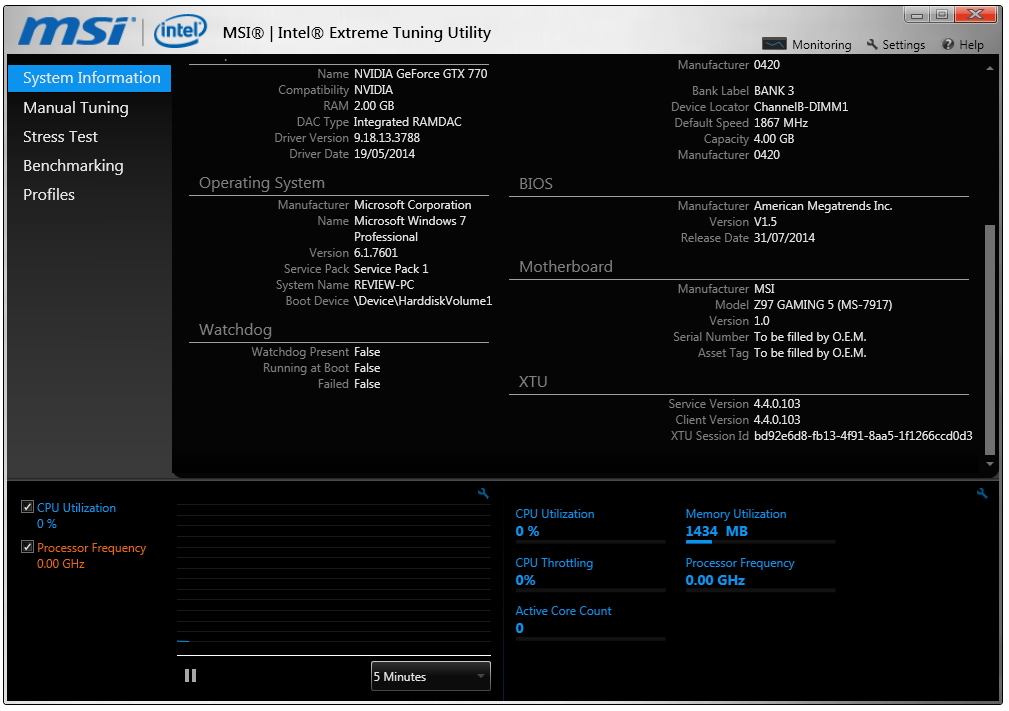
MSI / Intel Extreme Tuning Utility
Intel’s overclocking tool for 9-series motherboards also makes a showing on the driver CD we used, with MSI modifying the look to include their logos.
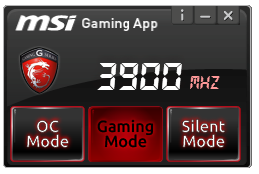
MSI Gaming App
One of the Gaming series features is a small interface to assist with quick overclocking. The Gaming App offers three modes – OC, Gaming and Silent. The OC Mode requires a restart and is akin to selecting OC Genie, while Gaming Mode ensures that all the cores are at their top turbo frequency. Silent Mode invokes the idle processor speed such that the fans are spinning slowly.
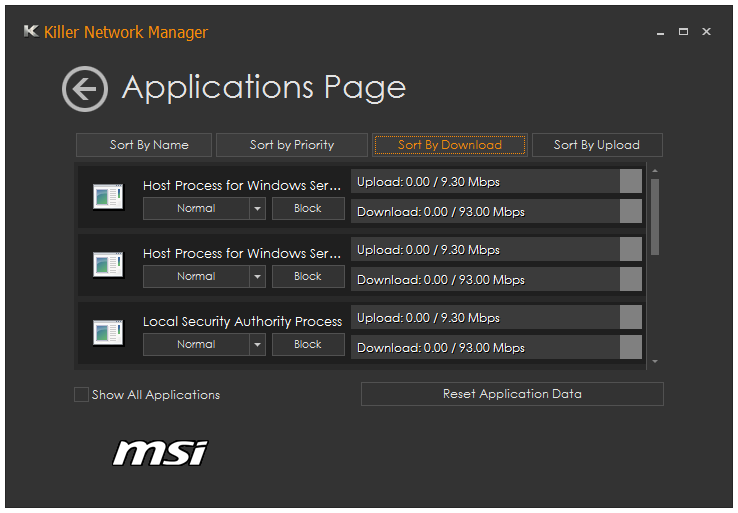
Killer Network Manager
Due to MSI’s use of the Killer network controller, Qualcomm bundles some network prioritization software along for manufacturers to include. This is also branded with MSI’s logo, and is a very basic interface for adjusting network priority compared to other solutions such as cFos.
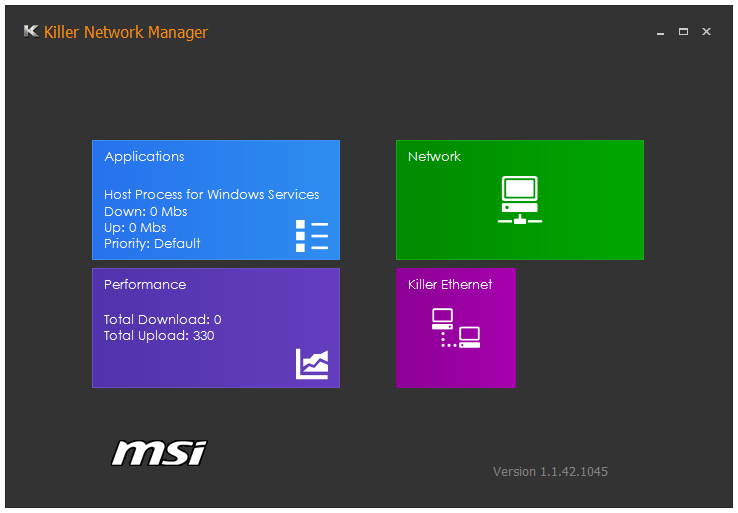
For example, it could be extremely handy to have a ‘Gaming’ mode that puts all the common game executable files into high priority mode, rather than having to scroll through a list that includes all the small windows software that requires network access.
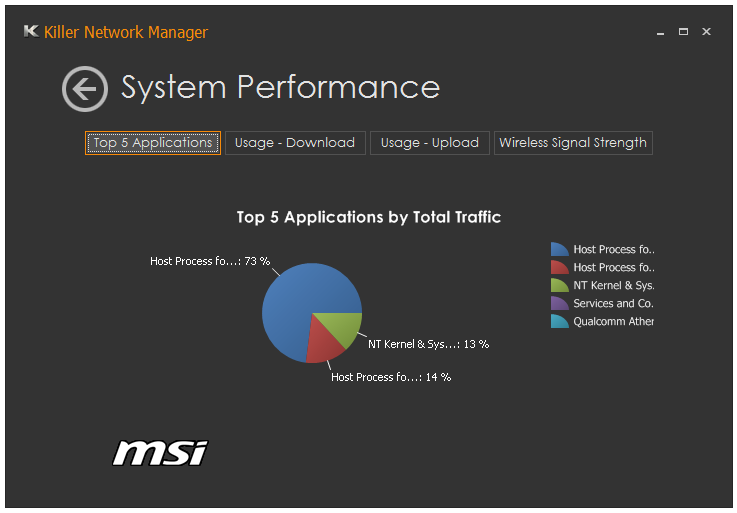
In the system performance screen, the layout is flawed if any software has a name longer than 12-15 characters.
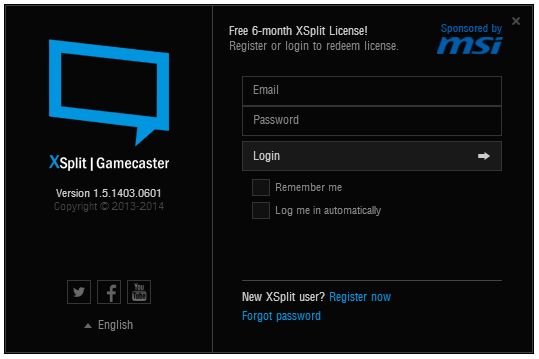
XSplit Gamecaster
Apparently watching videos of other people playing a game is a thing. For this, MSI has bundled a 6-month premium license to XSplit Gamecaster to aid users making these videos.
Sound Blaster Cinema 2
Part of the Audio Boost package includes Sound Blast Cinema 2 software for managing the audio setup. For our audio tests, this had to be disabled in order to get a clean result.


MSI Z97 Gaming 5 In The Box
A gaming branded motherboard has the opportunity of offer a different experience to other motherboard segments. PC Gaming is growing, partially fuelled by popular games and increased resolution sizes driving GPU sales, and MSI’s ‘Gaming’ ecosystem aims to cater for as much as the market as MSI can manage. From the motherboard perspective, aside from the styling, having gaming related box bundles can turn a regular purchase into one that users might suggest to others. The only downside of this is the cost – placing plenty of gaming extras might move the motherboard into a price segment it cannot compete in. At the super high-end, some motherboards get game bundles, but at $148 there is not much room to maneuver.
In the MSI Z97 Gaming 5 we have:
Driver Disk
User Guide
Rear IO Shield
Quick Start Guide
Cable Labels
MSI Gaming Door Hanger
MSI Gaming Series Case Badge
Quick Connectors for the Front Panel
Two SATA Cables
Flexi SLI Bridge
Audio Power Adapter
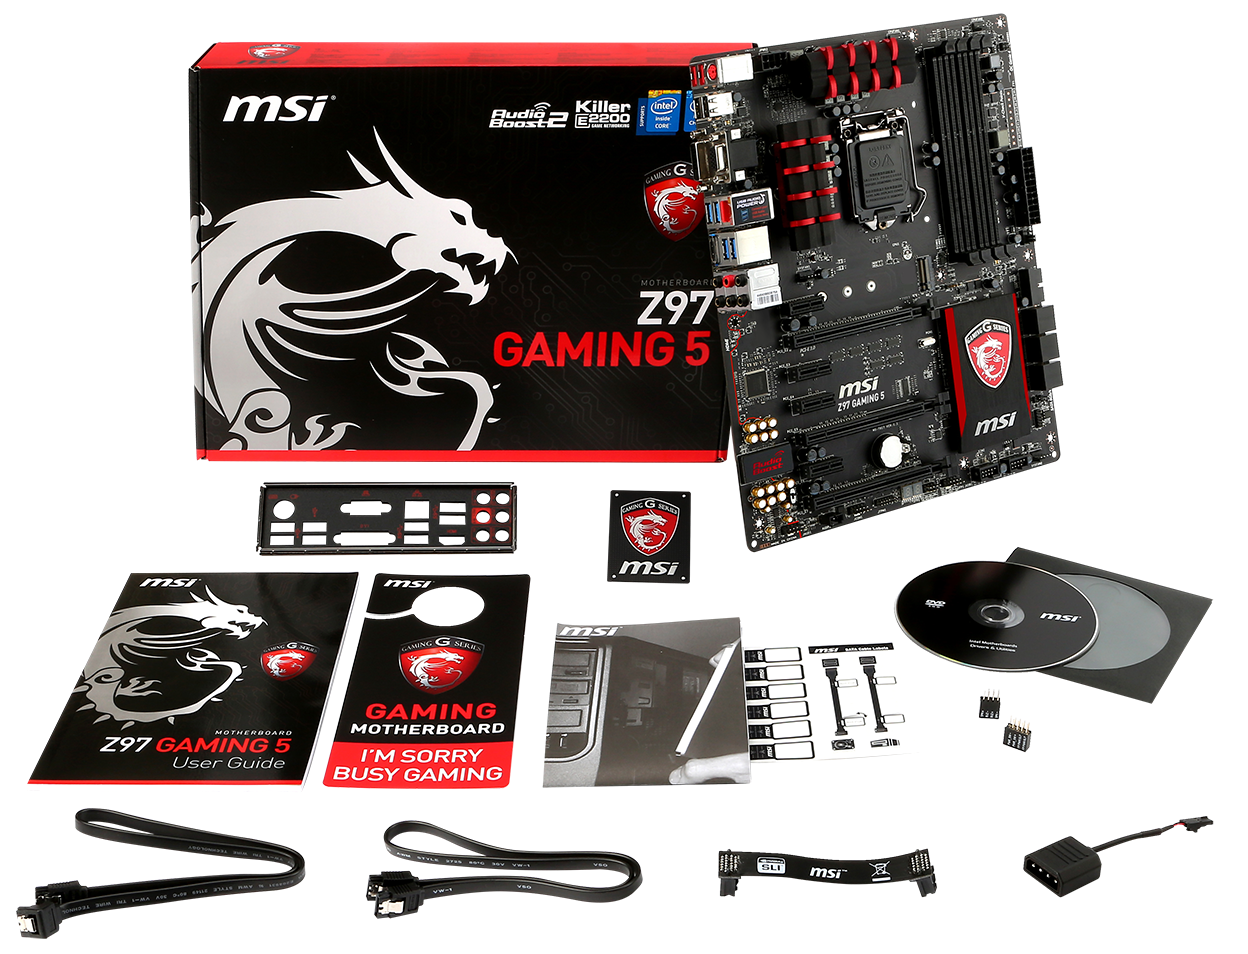
Here we come across another problem with Gaming motherboard bundles. Features like the door hanger and case badge are interesting to have, but ultimately do not add functionality to the system aside from promoting the use of MSI products. Only having two SATA cables is an oversight – while it caters for an SSD + HDD combination, the minute an ODD is added or a second storage device, more cables are needed.
Many thanks to...
We must thank the following companies for kindly providing hardware for our test bed:
Thank you to OCZ for providing us with PSUs and SSDs.
Thank you to G.Skill for providing us with memory.
Thank you to Corsair for providing us with an AX1200i PSU and a Corsair H80i CLC.
Thank you to MSI for providing us with the NVIDIA GTX 770 Lightning GPUs.
Thank you to Rosewill for providing us with PSUs and RK-9100 keyboards.
Thank you to ASRock for providing us with some IO testing kit.
Thank you to Cooler Master for providing us with Nepton 140XL CLCs.
Test Setup
| Processor | Intel Core i7-4770K ES 4 Cores, 8 Threads, 3.5 GHz (3.9 GHz Turbo) |
| Motherboard | MSI Z97 Gaming 5 |
| Cooling | Cooler Master Nepton 140XL Corsair H80i Thermaltake TRUE Copper |
| Power Supply | OCZ 1250W Gold ZX Series Corsair AX1200i Platinum PSU |
| Memory | G.Skill RipjawsZ 4x4 GB DDR3-1600 9-11-9 Kit |
| Memory Settings | 1600 9-11-9-27 1T tRFC 240 |
| Video Cards | MSI GTX 770 Lightning 2GB (1150/1202 Boost) |
| Video Drivers | NVIDIA Drivers 337 |
| Hard Drive | OCZ Vertex 3 256GB |
| Optical Drive | LG GH22NS50 |
| Case | Open Test Bed |
| Operating System | Windows 7 64-bit SP1 |
| USB 2/3 Testing | OCZ Vertex 3 240GB with SATA->USB Adaptor |
MSI Z97 Gaming 5 Overclocking
Experience with MSI Z97 Gaming 5
MSI’s overclocking regime starts with OC Genie for an easy one-button overclock. Our thoughts on OC Genie have been relatively consistent over the last few generations – offering only one automatic overclock is easy to use but for those users who want a bit more without manual overclocking, it might be a little short sighted.
Manual overclockers should be pleased with MSI’s BIOS adjustment for Z97, giving overclocking options in a nice ordered list compared to a run-on list with no order. The use of Simple/Advanced modes also helps.
In our tests, we found OC Genie on an i7-4770K to come up a little short. It offered a 4.0 GHz overclock, which is only 100 MHz above stock operation. With a multi-stage OC Genie, we might have seen 4.0 – 4.4 GHz for those CPUs that can perform. For manual overclocking, we achieved 4.6 GHz, although it must be noted that the stock voltage was quite high.
Methodology:
Our standard overclocking methodology is as follows. We select the automatic overclock options and test for stability with PovRay and OCCT to simulate high-end workloads. These stability tests aim to catch any immediate causes for memory or CPU errors.
For manual overclocks, based on the information gathered from previous testing, starts off at a nominal voltage and CPU multiplier, and the multiplier is increased until the stability tests are failed. The CPU voltage is increased gradually until the stability tests are passed, and the process repeated until the motherboard reduces the multiplier automatically (due to safety protocol) or the CPU temperature reaches a stupidly high level (100ºC+). Our test bed is not in a case, which should push overclocks higher with fresher (cooler) air.
Overclock Results:
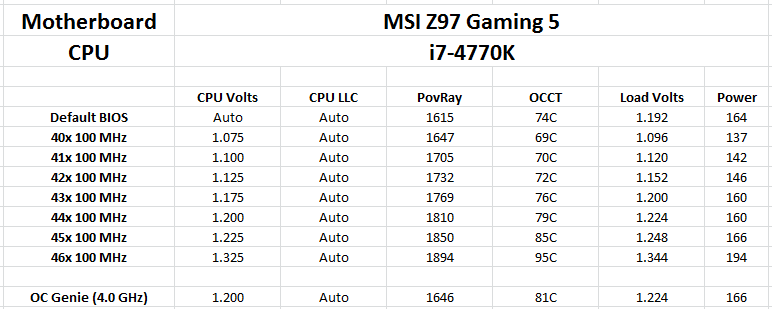
The high voltage at stock lead to a severe drop in power consumption if users are willing to adjust the voltage manually.
System Benchmarks
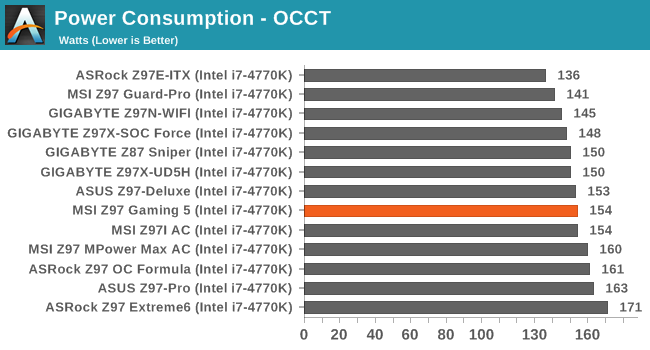
Power Consumption
Power consumption was tested on the system while in a single MSI GTX 770 Lightning GPU configuration with a wall meter connected to the OCZ 1250W power supply. This power supply is Gold rated, and as I am in the UK on a 230-240 V supply, leads to ~75% efficiency > 50W, and 90%+ efficiency at 250W, suitable for both idle and multi-GPU loading. This method of power reading allows us to compare the power management of the UEFI and the board to supply components with power under load, and includes typical PSU losses due to efficiency. These are the real world values that consumers may expect from a typical system (minus the monitor) using this motherboard.
While this method for power measurement may not be ideal, and you feel these numbers are not representative due to the high wattage power supply being used (we use the same PSU to remain consistent over a series of reviews, and the fact that some boards on our test bed get tested with three or four high powered GPUs), the important point to take away is the relationship between the numbers. These boards are all under the same conditions, and thus the differences between them should be easy to spot.

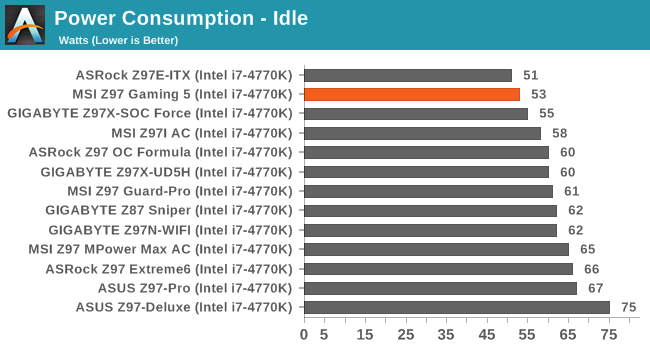
MSI’s idle power consumption numbers are nice and low, although this could potentially be pushed down further with Eco Center.
Windows 7 POST Time
Different motherboards have different POST sequences before an operating system is initialized. A lot of this is dependent on the board itself, and POST boot time is determined by the controllers on board (and the sequence of how those extras are organized). As part of our testing, we look at the POST Boot Time using a stopwatch. This is the time from pressing the ON button on the computer to when Windows 7 starts loading. (We discount Windows loading as it is highly variable given Windows specific features.)
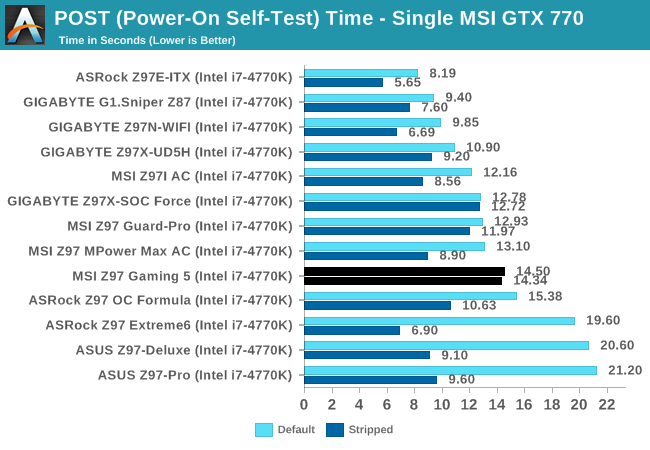
Z97 should be a good target for POST optimization, although the MSI clocks in at over 14 seconds in both stock and stripped timings.
Rightmark Audio Analyzer 6.2.5
Rightmark:AA indicates how well the sound system is built and isolated from electrical interference (either internally or externally). For this test we connect the Line Out to the Line In using a short six inch 3.5mm to 3.5mm high-quality jack, turn the OS speaker volume to 100%, and run the Rightmark default test suite at 192 kHz, 24-bit. The OS is tuned to 192 kHz/24-bit input and output, and the Line-In volume is adjusted until we have the best RMAA value in the mini-pretest. We look specifically at the Dynamic Range of the audio codec used on board, as well as the Total Harmonic Distortion + Noise.
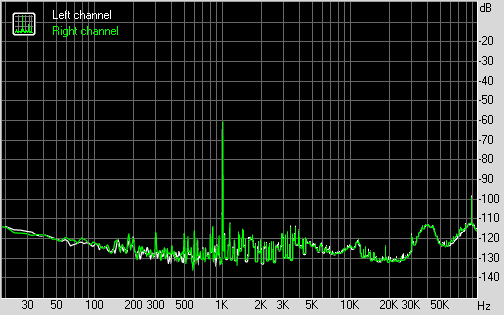
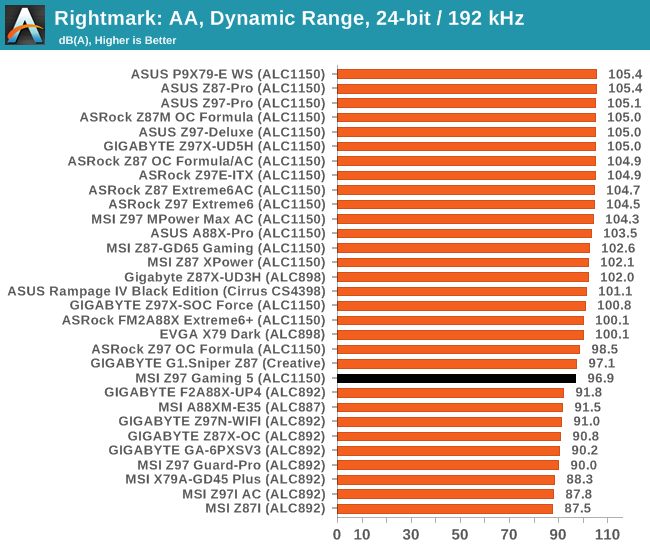
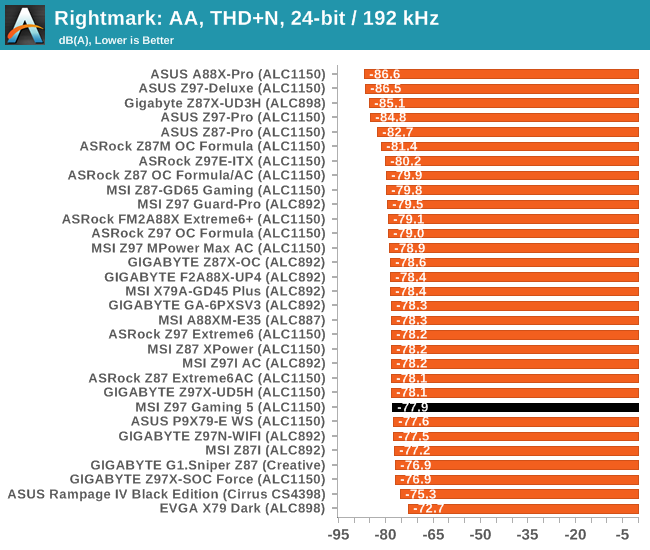
Similar to the Z97 OC Formula, the results of an enhanced ALC1150 on Z97 seem relatively low compared to Z87 testing. The use of extra tools such as Sound Blaster get in the way of our testing by artificially adjusting the signal, and even when turned off in the software they never seem to be turned off completely, hence why base ALC1150 models tend to do better in our test. We mentioned this to MSI before finishing up the review, and they showed us results nearer 104 dBA with the latest drivers which should be available online soon.
USB Backup
For this benchmark, we transfer a set size of files from the SSD to the USB drive using DiskBench, which monitors the time taken to transfer. The files transferred are a 1.52 GB set of 2867 files across 320 folders – 95% of these files are small typical website files, and the rest (90% of the size) are small 30 second HD videos. In an update to pre-Z87 testing, we also run MaxCPU to load up one of the threads during the test which improves general performance up to 15% by causing all the internal pathways to run at full speed.
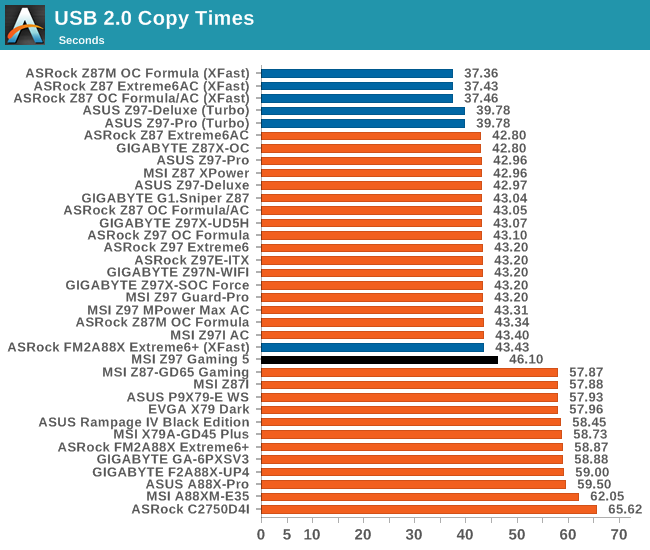
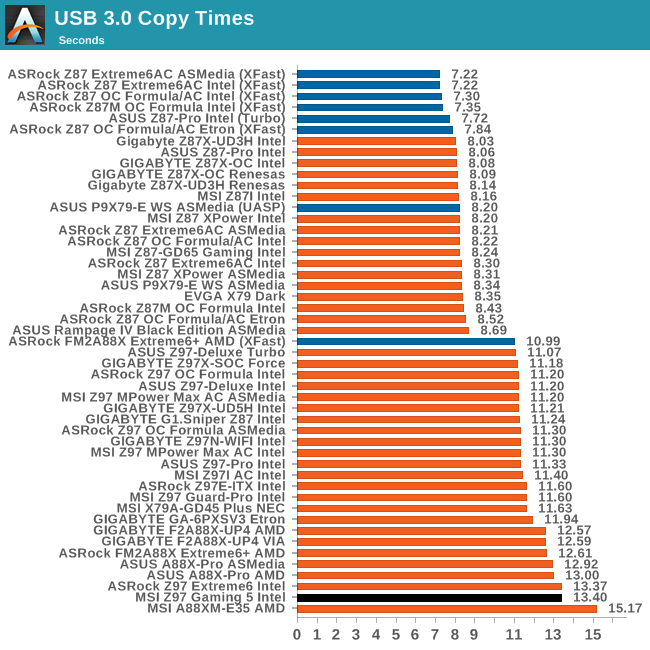
Every so often, MSI’s USB tests seem to be slower than everyone else. I am not sure why that is. Sometimes motherboard manufacturers will suggest different BIOS settings for when things are tested, but as a general rule at AnandTech I ignore those completely. MSI doesn’t offer such suggestions, but the results speak for themselves: a drop in USB 2.0 and USB 3.0 copy speed.
DPC Latency
Deferred Procedure Call latency is a way in which Windows handles interrupt servicing. In order to wait for a processor to acknowledge the request, the system will queue all interrupt requests by priority. Critical interrupts will be handled as soon as possible, whereas lesser priority requests such as audio will be further down the line. If the audio device requires data, it will have to wait until the request is processed before the buffer is filled.
If the device drivers of higher priority components in a system are poorly implemented, this can cause delays in request scheduling and process time. This can lead to an empty audio buffer and characteristic audible pauses, pops and clicks. The DPC latency checker measures how much time is taken processing DPCs from driver invocation. The lower the value will result in better audio transfer at smaller buffer sizes. Results are measured in microseconds.
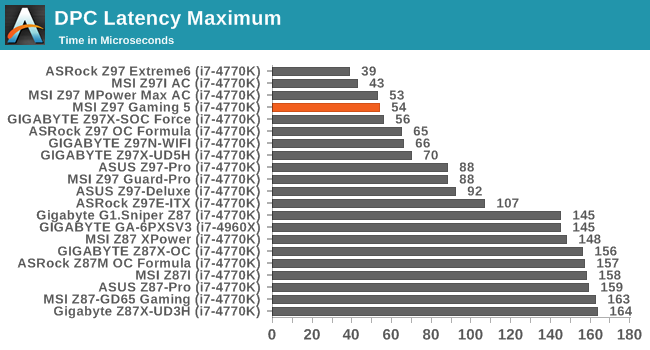
To counterbalance the USB speed issue, the MSI Z97 Gaming 5 does particularly well in our DPC Latency tests. In fact three of the top four positions in this benchmark are populated by MSI.
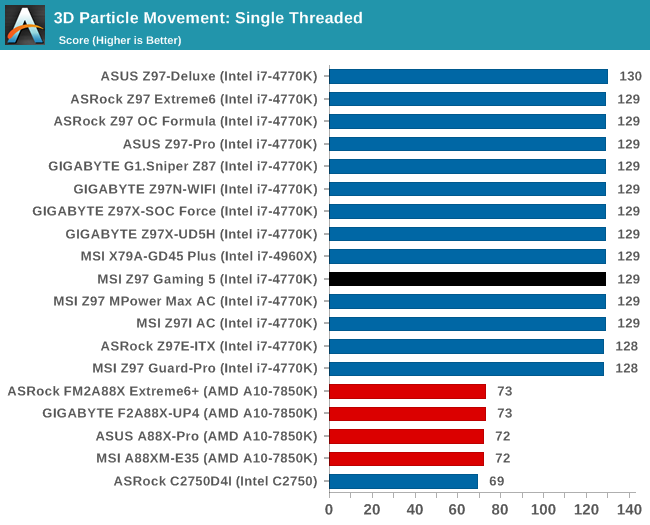
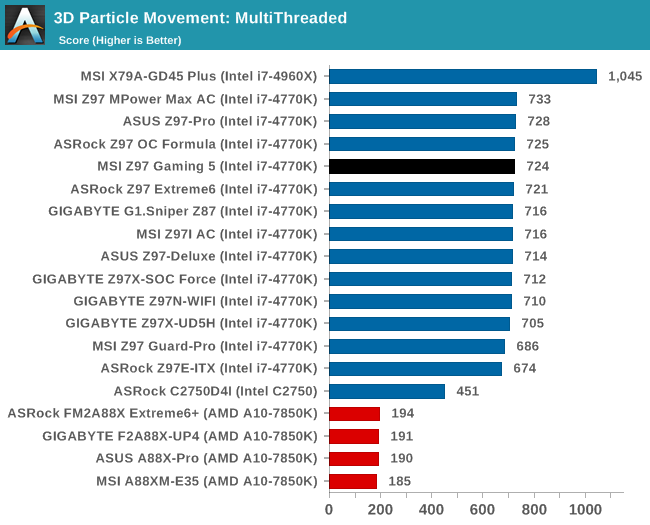
CPU Benchmarks
Readers of our motherboard review section will have noted the trend in modern motherboards to implement a form of MultiCore Enhancement / Acceleration / Turbo (read our report here) on their motherboards. This does several things, including better benchmark results at stock settings (not entirely needed if overclocking is an end-user goal) at the expense of heat and temperature. It also gives in essence an automatic overclock which may be against what the user wants. Our testing methodology is ‘out-of-the-box’, with the latest public BIOS installed and XMP enabled, and thus subject to the whims of this feature. It is ultimately up to the motherboard manufacturer to take this risk – and manufacturers taking risks in the setup is something they do on every product (think C-state settings, USB priority, DPC Latency / monitoring priority, memory subtimings at JEDEC). Processor speed change is part of that risk, and ultimately if no overclocking is planned, some motherboards will affect how fast that shiny new processor goes and can be an important factor in the system build.
The MSI Z97 Gaming 5 implements an aggressive form of MultiCore Turbo, giving the CPU a boost during multithreaded loads.
Point Calculations – 3D Movement Algorithm Test: link
3DPM is a self-penned benchmark, taking basic 3D movement algorithms used in Brownian Motion simulations and testing them for speed. High floating point performance, MHz and IPC wins in the single thread version, whereas the multithread version has to handle the threads and loves more cores.
Compression – WinRAR 5.0.1: link
Our WinRAR test from 2013 is updated to the latest version of WinRAR at the start of 2014. We compress a set of 2867 files across 320 folders totaling 1.52 GB in size – 95% of these files are small typical website files, and the rest (90% of the size) are small 30 second 720p videos.
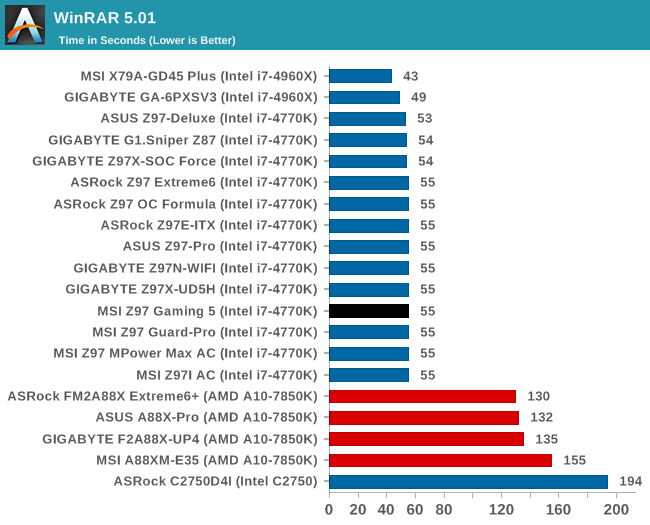
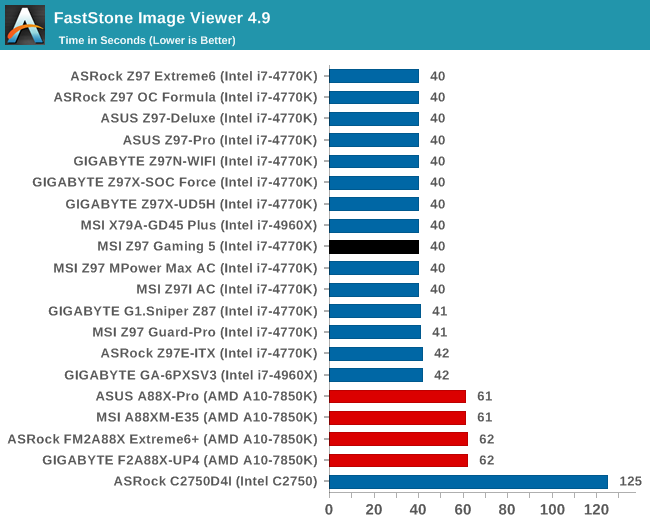
Image Manipulation – FastStone Image Viewer 4.9: link
Similarly to WinRAR, the FastStone test us updated for 2014 to the latest version. FastStone is the program I use to perform quick or bulk actions on images, such as resizing, adjusting for color and cropping. In our test we take a series of 170 images in various sizes and formats and convert them all into 640x480 .gif files, maintaining the aspect ratio. FastStone does not use multithreading for this test, and thus single threaded performance is often the winner.
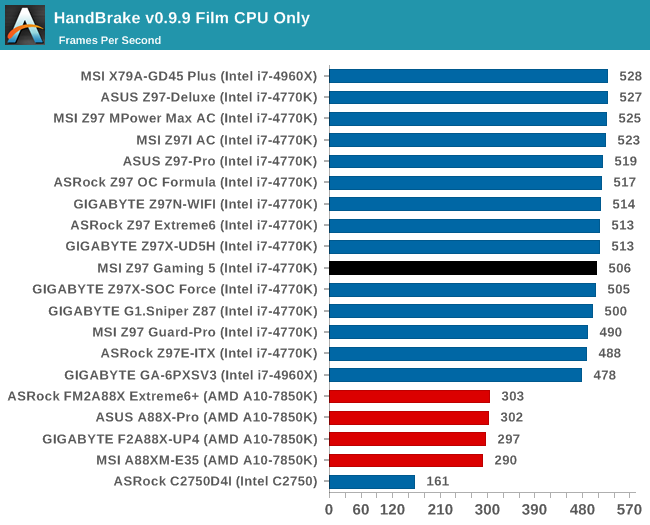
Video Conversion – Handbrake v0.9.9: link
Handbrake is a media conversion tool that was initially designed to help DVD ISOs and Video CDs into more common video formats. The principle today is still the same, primarily as an output for H.264 + AAC/MP3 audio within an MKV container. In our test we use the same videos as in the Xilisoft test, and results are given in frames per second.

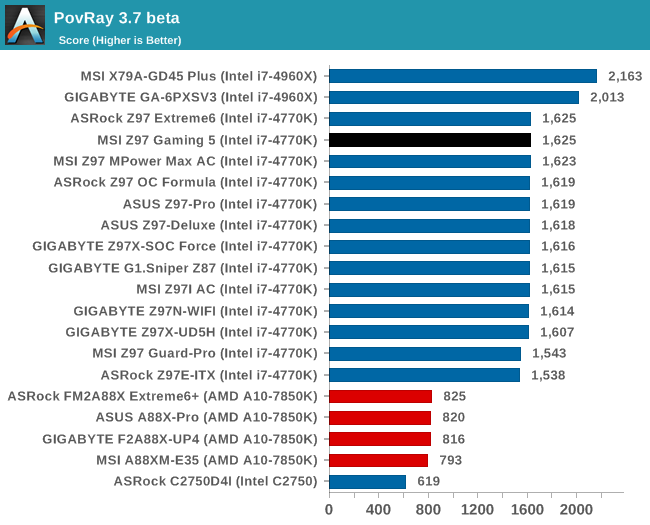
Rendering – PovRay 3.7: link
The Persistence of Vision RayTracer, or PovRay, is a freeware package for as the name suggests, ray tracing. It is a pure renderer, rather than modeling software, but the latest beta version contains a handy benchmark for stressing all processing threads on a platform. We have been using this test in motherboard reviews to test memory stability at various CPU speeds to good effect – if it passes the test, the IMC in the CPU is stable for a given CPU speed. As a CPU test, it runs for approximately 2-3 minutes on high end platforms.
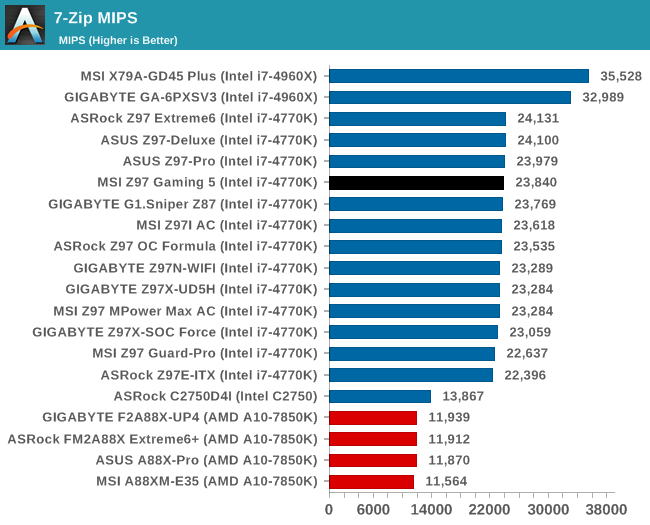
Synthetic – 7-Zip 9.2: link
As an open source compression tool, 7-Zip is a popular tool for making sets of files easier to handle and transfer. The software offers up its own benchmark, to which we report the result.
Gaming Benchmarks
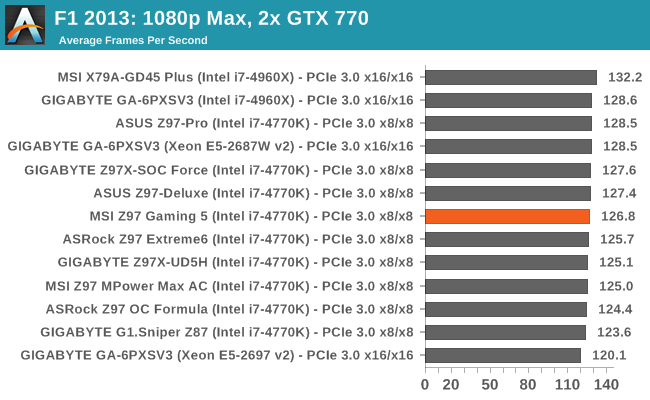
F1 2013
First up is F1 2013 by Codemasters. I am a big Formula 1 fan in my spare time, and nothing makes me happier than carving up the field in a Caterham, waving to the Red Bulls as I drive by (because I play on easy and take shortcuts). F1 2013 uses the EGO Engine, and like other Codemasters games ends up being very playable on old hardware quite easily. In order to beef up the benchmark a bit, we devised the following scenario for the benchmark mode: one lap of Spa-Francorchamps in the heavy wet, the benchmark follows Jenson Button in the McLaren who starts on the grid in 22nd place, with the field made up of 11 Williams cars, 5 Marussia and 5 Caterham in that order. This puts emphasis on the CPU to handle the AI in the wet, and allows for a good amount of overtaking during the automated benchmark. We test at 1920x1080 on Ultra graphical settings.

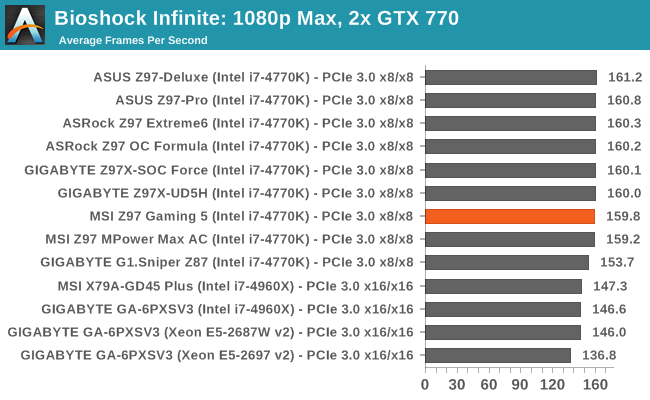
Bioshock Infinite
Bioshock Infinite was Zero Punctuation’s Game of the Year for 2013, uses the Unreal Engine 3, and is designed to scale with both cores and graphical prowess. We test the benchmark using the Adrenaline benchmark tool and the Xtreme (1920x1080, Maximum) performance setting, noting down the average frame rates and the minimum frame rates.

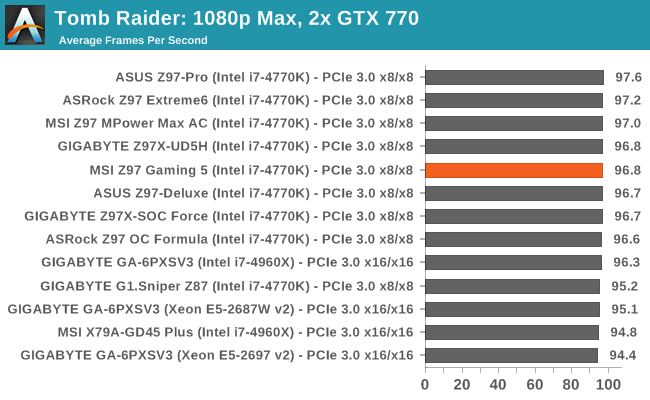
Tomb Raider
The next benchmark in our test is Tomb Raider. Tomb Raider is an AMD optimized game, lauded for its use of TressFX creating dynamic hair to increase the immersion in game. Tomb Raider uses a modified version of the Crystal Engine, and enjoys raw horsepower. We test the benchmark using the Adrenaline benchmark tool and the Xtreme (1920x1080, Maximum) performance setting, noting down the average frame rates and the minimum frame rates.

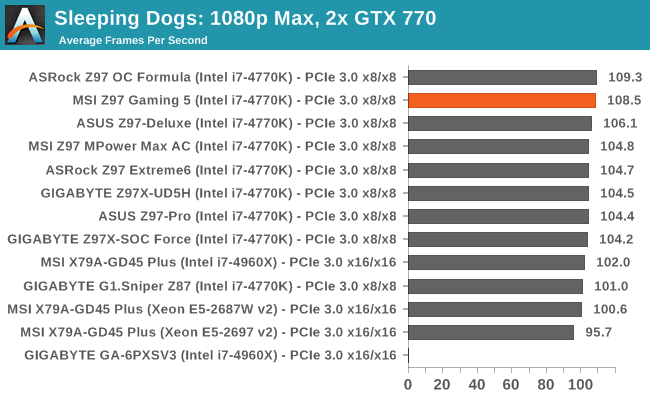
Sleeping Dogs
Sleeping Dogs is a benchmarking wet dream – a highly complex benchmark that can bring the toughest setup and high resolutions down into single figures. Having an extreme SSAO setting can do that, but at the right settings Sleeping Dogs is highly playable and enjoyable. We run the basic benchmark program laid out in the Adrenaline benchmark tool, and the Xtreme (1920x1080, Maximum) performance setting, noting down the average frame rates and the minimum frame rates.

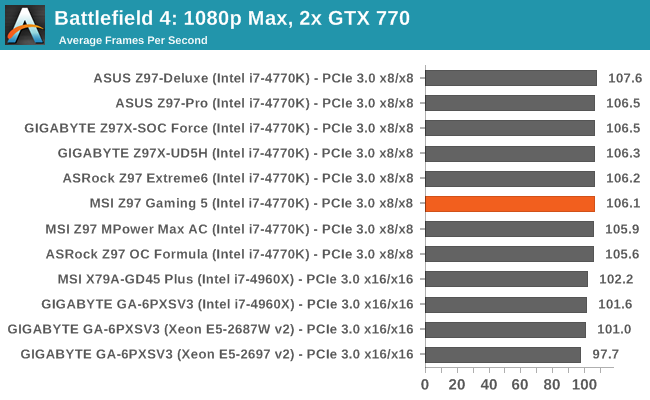
Battlefield 4
The EA/DICE series that has taken countless hours of my life away is back for another iteration, using the Frostbite 3 engine. AMD is also piling its resources into BF4 with the new Mantle API for developers, designed to cut the time required for the CPU to dispatch commands to the graphical sub-system. For our test we use the in-game benchmarking tools and record the frame time for the first ~70 seconds of the Tashgar single player mission, which is an on-rails generation of and rendering of objects and textures. We test at 1920x1080 at Ultra settings.

MSI Z97 Gaming 5 Conclusion
A gaming based motherboard has to satisfy two main criteria. The first is the gaming aspect, by offering gaming oriented technology that people can use and feel comfortable using. The second is the experience, and making sure that users understand what is in their system and how it can be used to its full advantage without piling a multitude of jargon into the mix. The only other caveat to a gaming build is the price which ultimately dictates what extra features get added on and where in the product stack it sits.
MSI’s Z97 Gaming 5 sits above the Gaming 3 and below the Gaming 7/9 models, and thrown into that mix is the Z97M and Z97I Gaming models, some of which also come with 802.11ac WiFi. We have seen channel motherboards at $150 come with WiFi, but MSI takes that budget and invests in other features for the Gaming 5: A styled PCB and heatsinks, a Killer E2205 series network port, upgraded audio, an enhanced USB power for audio, six months of XSplit and a couple of in-the-box extras too. It is also nice to see M.2 support, with 22x42 to 22x80 sized devices supported. It seems odd that there is not a connection hole for 22x30 devices though.
The motherboard supports three-way PCIe 3.0 CrossfireX and two-way SLI, although if any PCIe device is used in the final slot then SLI is disabled due to the x8/x4/x4 arrangement. This is the compromise that motherboard manufacturers have to make compared to an x8/x8 with x4 from the chipset type of layout. Due to MSI’s layout, it also affords four separate PCIe 2.0 x1 slots for additional connectivity cards.

The Z97 Gaming 5 uses an aggressive form of MultiCore Turbo, meaning that the CPU benchmark results are all relatively high. This is combined with good scores in DPC Latency and idle power consumption. On the other side of the coin, audio results need an update to get the best results, the 14+ second POST times are longer than expected and USB speeds at the bottom of the charts.
When one is looking for a gaming based build, the aspirations are all at the high end. We are talking i7 processors with tons of memory and perhaps a couple of 980s thrown in for good measure, with super-fast SSDs and perhaps one or more high resolution, high refresh rate monitors. The reality for many is that gaming on a budget is a large part of the market. The Z97 Gaming 5 is middle of the road in terms of price point and feature set to appeal to the i3 or i5 gamers, perhaps enough to warrant a small bit of overclocking too. These builders might spend the biggest chunk of their budget on a GPU, a nice monitor or a large SSD, and do not tend to use other cards. While the Z97 Gaming 5 is not perfect for onboard audio and USB speeds, it does offer an interesting data point in this part of the spectrum.
For me, as a power user, I might have preferred another SATA cable or two in the box along with an Intel + Killer network port combination. MSI’s Z97 Gaming range unfortunately does not offer an Intel NIC at any point, which might be an oversight.


