Original Link: https://www.anandtech.com/show/6427/gigabyte-h77nwifi-review-first-look-at-ivy-bridge-with-mitx
Gigabyte H77N-WiFi Review – First Look at Ivy Bridge with mITX
by Ian Cutress on November 6, 2012 12:00 PM EST- Posted in
- Gigabyte
- Motherboards
- H77
- mITX
Reviews of the Ivy Bridge platform at AnandTech have focused solely on the primary chipset supplied to most desktop users – Z77. In a twist, today we are reviewing both the H77 platform, but also a mITX product in the form of the Gigabyte H77N-WiFi. Gigabyte has released two mITX motherboards for use with Ivy Bridge processors – both the H77 and Z77 variants, and they see the H77 as the one to focus on. This makes sense as mITX builds are not often overclocked, and are limited to a single PCIe slot, making two of the main benefits of Z77 void and pointing to H77 as the answer.
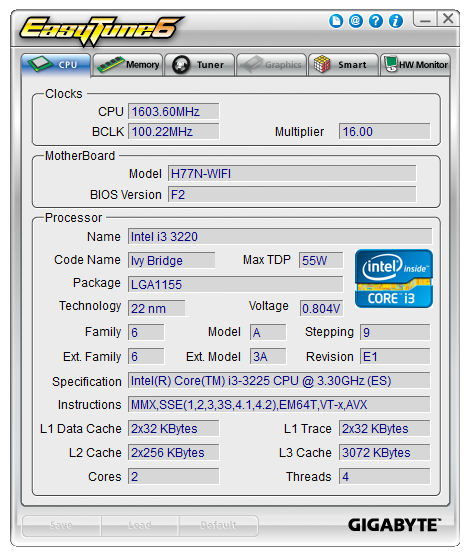
In a twist to previous 7-series reviews, we are going to focus our attention with mITX boards towards the i3-3225 processor. This is a dual core Ivy Bridge processor with both HyperThreading and Intel’s HD 4000 (the high end) integrated graphics, all within a 65W rated envelope. The direct competition to this lies at the hands of the Trinity A10-5800K, which we have reviewed in terms of pure performance and from a chipset point of view.
Gigabyte H77N-WiFi Overview
Measuring only 17cm x 17cm (6.7” x 6.7”), a mini-ITX motherboard has to work with very little PCB real estate. On high end motherboards, we often see that the addition of extra controllers and buttons can take up a lot of room – thus for a mITX product, we have to strip away all the excess, see what we are left with, and then add in features as appropriate.
For the large part, or H77 platform acts similar to the Z77. Our main differences with H77 are the lack of overclocking, the restriction of memory straps to DDR3-1600, and PCIe devices from the CPU are limited to a single x16 slot. Thus on a large mATX or ATX H77 product, extra slots for PCIe devices will most likely be taken up by x1 or x4 slots linked to the chipset, or PCI slots by PCIe-to-PCI conversion. H77 still gives us access to four USB 3.0 ports, two SATA 6 Gbps, four SATA 3 Gbps and video outputs.
From the perspective of small form factor systems the usual suspects for a product like this are in small 24/7 builds, HTPC, or a mobile gaming machine that can be easily carried. From the point of view of Gigabyte, this means that a H77 product makes sense, but a Z77 product should be available to users if so desired for overclocking. It should be noted that the H77 products should be able to be underclocked if required, though not always undervolted.
On the whole, the Gigabyte GA-H77N-WiFi is a nice build, although it contains a mixture of good and bad design choices. Due to the use of H77, there is no need for any substantial power management, so none is given – the board still uses Ultra Durable 4, but we have a 3+1 system with no heatsink. The main critical point with this board though (as will be the main critical point of many mITX builds) is the placement of the processor in relation to the memory and PCIe slot.
The socket area is up against the memory and the PCIe slot, meaning that users have a limited range of coolers to use. As shown later in the review, large coolers will have to be oriented correctly, with different memory choices, or disregarded altogether. If the cooler is large, then there is also intrusion onto the PCIe slot if the GPU has a rear back plate. This is not ideal. There are mITX boards were the socket is in a more amenable orientation, but yet it is placed in such a location that only stock coolers or all-in-one liquid cooling systems are to be suggested. With the popularity of ‘tall’ mITX cases such as the Bitfenix Prodigy, large coolers may have to find their way onto these smaller systems in due course. Maybe I am just being picky – this H77 board is not designed for overclocking, and thus big coolers are not necessarily needed.
After some intense discussion with Gigabyte regarding this product, it comes to light that the H77 and Z77 mITX boards that are on sale to consumers are actually models designed for a specific customer in Asia. Gigabyte do this on a regular basis – if a particular business customer (e.g. a distributor, system builder) wants a specific design and is willing to place a large order, then Gigabyte will go that mile to make the product. Sometimes these products are then also marketed to home users, such as the H77 and Z77 mITX.
This is in important point, given that we have baffling placement locations on the H77N-WiFi. We have SATA ports at the top end of the motherboard, along with the front panel header and a USB 3.0 header right up against the IO panel. The 4-pin CPU power connector is located so far into the board that it raises concern about how Gigabyte would assume that the board would be placed in a case with respect to the front panel and power supply.
The board offers several plus points, especially with the fact that the board is kitting out with dual HDMI ports. This allows for the division of labor between video output on one and audio output on the other (for home audio systems), or both outputs on both for multi-monitor setups. (Contrary to what was my belief, the Z77 / Ivy Bridge specifications do not dictate which digital outputs need to be present, only that there are three to use – meaning that on full size Z77 ATX boards, manufacturers could use dual HDMI ports there instead of DVI-D.) There are also dual Realtek network ports for home server/SOHO setups, alongside an Intel WiFi module capable of connecting to WiDi displays for cable-less management.
Performance wise, our only comparison point lies with an equivalent Trinity based platform. In this circumstance, the i3-3225 trades blows with the A10-5800K, but both sides put up crushing blows against the other. On the Intel side, we have superior single threaded performance, especially in FP benchmarks where the difference can be 43% higher on the Intel. This also brings the results using a discrete graphics card in favor for the Intel. In comparison, the Trinity platform goes toe-to-toe with Intel on multithreaded INT benchmarks, and scores a win when comparing IGP performance.
Even though this product initially being produced for a sole customer with specific needs, it does offer a price-competitive take on the mITX 7-series design.
Visual Inspection
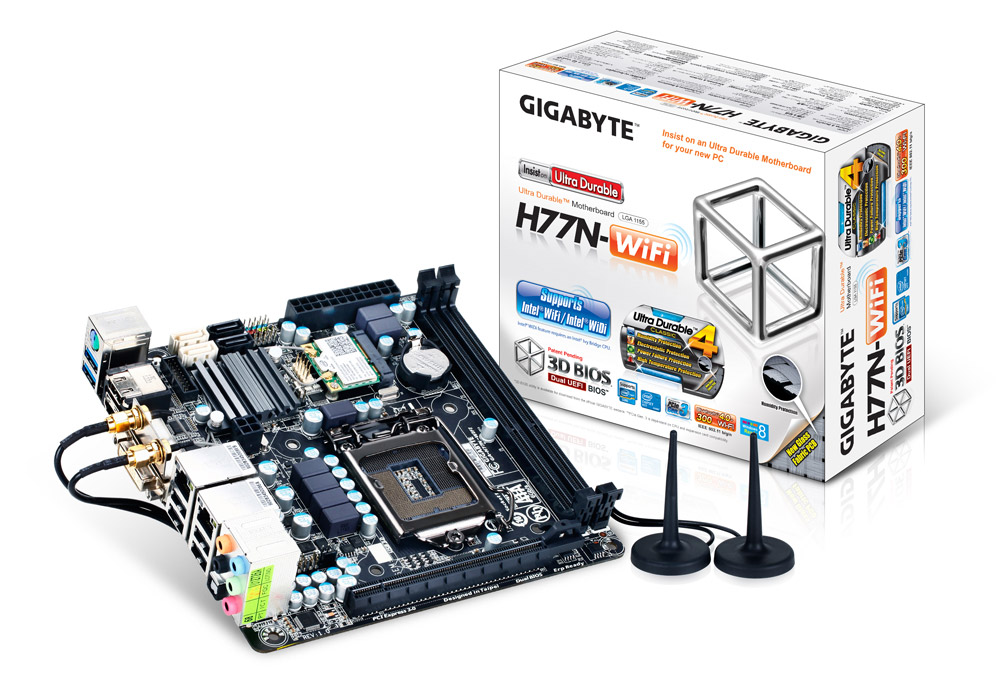
As the H77N-WiFi is a mini-ITX board, we have the standard mITX dimensions with the PCB – 17cm x 17cm. In total the motherboard offers two full length DDR3 DIMM slots, a total of four SATA ports, two fan headers, one USB 3.0 header, one USB 2.0 header, dual Ethernet ports, an integrated Intel WiFi module with WiDi support, dual HDMI input with DVI-I and a single PCIe 3.0 x16 slot.
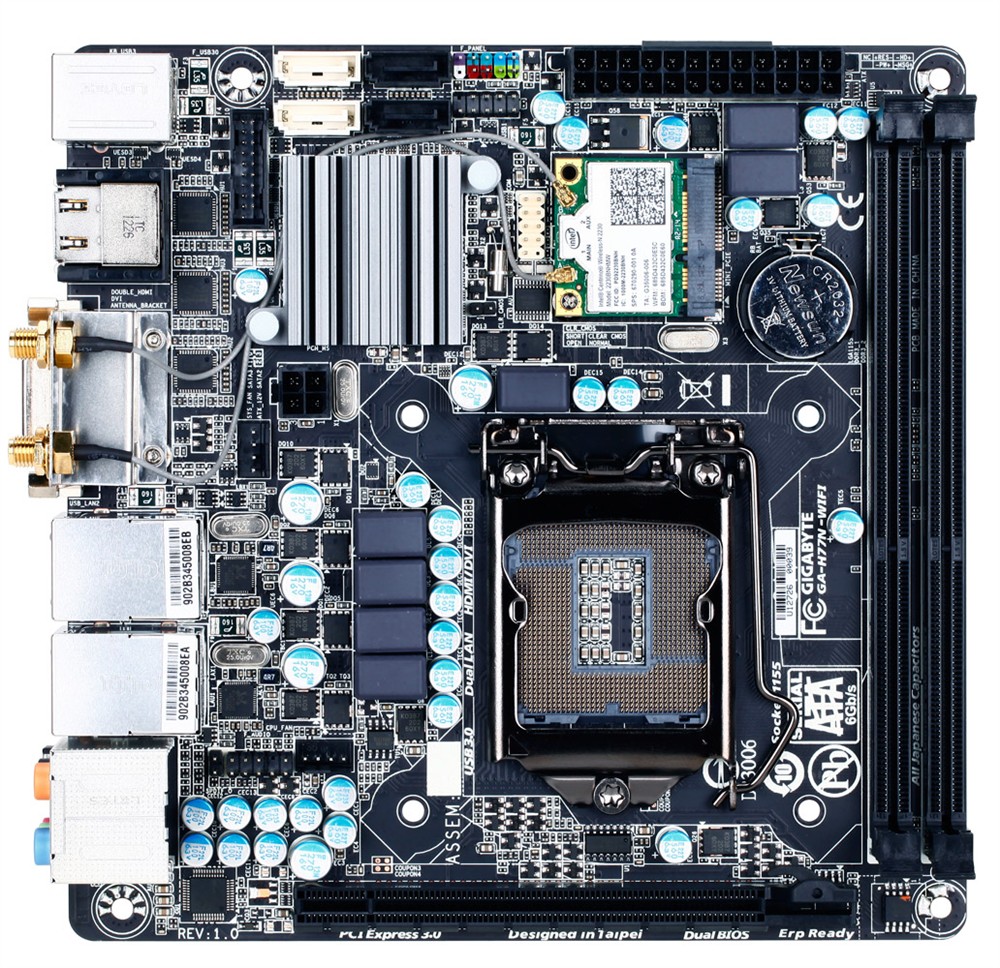
The socket area is, for lack of a better word, confusingly placed. We find it on the bottom right of the image above, and looking closer at the picture we see the four socket holes are enclosed in a white square on the PCB. This is the Intel minimum specification for the 1155 socket platform – all items in this space has a maximum z-dimension in order to allow the Intel air cooler to function appropriately. Motherboard manufacturers all adhere to this and anything extra beyond this space is at the discretion of the manufacturer. Typically on larger boards manufacturers will give more space, as users may want to large air coolers in order to improve overclocking or thermal performance within the case. Admittedly on a mITX board there is not much extra room to give, but Gigabyte have placed two of the edges up against two main components of the system – the memory and the PCIe slot. The motherboard is marketed as an all-round performer, meaning in some builds (especially with cases like the Bitfenix Prodigy) users will put in a large GPU combined with tall memory. It has been reported that the close proximity of the socket area to the GPU will cause problems with GPUs that have large backplates, and essentially Gigabyte have limited users to the stock air cooler or similar designs that do not breach the x-y component of the socket area, such as all-in-one liquid coolers.
I should stress that this is a common problem on *most* H77/Z77 mITX boards, and not just on this one. The alternative would be to arrange the socket and chipset layout as with normal ATX boards – with the socket at the top and the chipset/SATA ports at the bottom. I would have suggested a couple of extra design features in order to ease the burden. The WiFi module could be moved to the underside of the board, or replacing the memory slots with SO-DIMM modules. Even the SO-DIMM could be moved to the underside and slanted, similar to laptops and notebooks. This would leave more space on top to play with SATA ports to give the full complement, headers or the like. One of the downsides from a construction point of view may be complexity, or having to add more PCB layers, which in turn adds cost.
Aside from the socket area, I should point out the fan headers. With the Gigabyte H77N-WiFi, we have two – both to the left of the socket, both 4-pin. One is next to the onboard audio header, and the other is next to the 4-pin CPU power connector. The location of this 4-pin CPU power connector is a little odd. While I accept that it must be near the CPU itself, being in the middle of the board means that a PSU cable has to stretch over a good number of components. This restricts airflow and reduces aesthetic appeal (if desired). If the CPU and the chipset were swapped around, this would be less of an issue perhaps.

Along the top of the board we have our SATA ports. The H77 chipset offers the same amount as the Z77, this being two SATA 6 Gbps and four SATA 3 Gbps. Nevertheless, due to real estate concerns, we lose two of the SATA 3 Gbps ports on the Gigabyte H77N-WiFi. To the left of these is the solitary USB 3.0 port, powered by the chipset. The chipset itself is hidden behind a small heatsink. Moving right we have the front panel header and a USB 2.0 header. The Intel WiFi module is located flat against the motherboard, with the two cables connecting the module to the antenna snaking under the chipset heatsink. Besides the 24-pin ATX connector we have the motherboard battery. This is flat against the PCB like in ATX models, rather than upright which is what we normally see on PCB limited designs.

The rear panel on the Gigabyte H77N-WiFi is one thing done right. From left to right we have a combination PS/2 port, two USB 3.0 in blue (chipset), dual HDMI, two antenna ports, DVI-I, two gigabit Ethernet ports (Realtek), four USB 2.0 ports, optical S/PDIF output and audio jacks (Realtek ALC892). It should be noted that Gigabyte use their one-fuse-per-USB port system, meaning that should one USB port fail then the rest of the USB in the block are not affected.


Board Features
| Gigabyte H77N-WiFi | |
| Price | Link |
| Size | Mini ITX |
| CPU Interface | LGA-1155 |
| Chipset | Intel H77 |
| Memory Slots |
Two DDR3 DIMM slots supporting up to 32 GB Up to Dual Channel, 1066-1600 MHz |
| Video Outputs |
2 x HDMI, up to 1920x1200 DVI-I, up to 1920x1080 |
| Onboard LAN |
2 x Realtek 8111E 1 x Intel WiFi Module |
| Onboard Audio | Realtek ALC892 |
| Expansion Slots | 1 x PCIe 3.0 x16 |
| Onboard SATA/RAID |
2 x SATA 6 Gbps, Support for RAID 0, 1, 5, 10 2 x SATA 3 Gbps, Support for RAID 0, 1, 5, 10 |
| USB |
4 x USB 3.0 (Chipset) [2 back panel, 2 onboard] 6 x USB 2.0 (Chipset) [4 back panel, 2 onboard] |
| Onboard |
2 x SATA 6 Gbps 2 x SATA 3 Gbps 1 x USB 3.0 Header 1 x USB 2.0 Header 1 x COM Port Header 2 x Fan Headers 1 x Onboard Audio Header |
| Power Connectors |
1 x 24-pin ATX Power Connector 1 x 4-pin CPU Power Connector |
| Fan Headers |
1 x CPU (4-pin) 1 x SYS (4-pin) |
| IO Panel |
1 x PS/2 Combination Port 2 x USB 3.0 (Blue) 2 x HDMI 1 x DVI-I 2 x Antenna Port 2 x Realtek 8111E GbE 4 x USB 2.0 (Black) 1 x S/PDIF Optical Output Audio Jacks |
| Warranty Period | 3 Years |
| Product Page | Link |
Asides from the layout choices which could be questionable, we could also argue if there is additional merit of including two Ethernet ports as well an Intel WiFi module. A lot depends on the layout of your system – home network and NAS via Ethernet, but also connected to the home network via WiFi is one orientation.
As I have explained, the Gigabyte H77N-WiFi is price competitive compared to Z77 ATX boards. Part of this comes down to using Realtek network controllers rather than Intel (even if we do have an Intel WiFi module), and the less than optimal ALC892 codec. If this does not bother the user, then as long as putting the system goes well, then the Gigabyte can offer a nice ‘bang-for-buck’ product.
The nature of living beings is to adapt to the surroundings around them – if it is cold, we put on warm clothes, and when it is wet, we tend to seek shelter. When it comes to technology and electronic products, the same can not be said. Innovation is driven by competition, otherwise product lines stagnate. If there was a technological elixir to end all competition, that would be it. By now you are probably wondering what this has to do, if anything, with the BIOS for a motherboard.
Adaptation of the BIOS in the past couple of years has been driven by competition. Before graphical interfaces for the BIOS became the norm, we were greeted with white text on blue screens, or white on black. Now we have a vast array of graphical options at our disposal, and each company is trying to outdo the other.
Initially two companies had the upper hand – both ASUS and ASRock had systems to use multiple colors and mouse movement, making BIOS navigation more intuitive. MSI went a different route and included games in their BIOS as part of a technical exercise to see what was possible. Gigabyte sat back and kept with the old style BIOS. At the time, that meant they were not on the crest of that innovation wave, but I am told by Gigabyte that the reason was due to development of their own BIOS system rather than reskinning an AMI or Phoenix BIOS base code like the other manufacturers. When X79 motherboards were released, Gigabyte showed us the fruit of their endeavors, which ended up being an adapted AMI BIOS rather than a complete rewrite. I was not impressed.
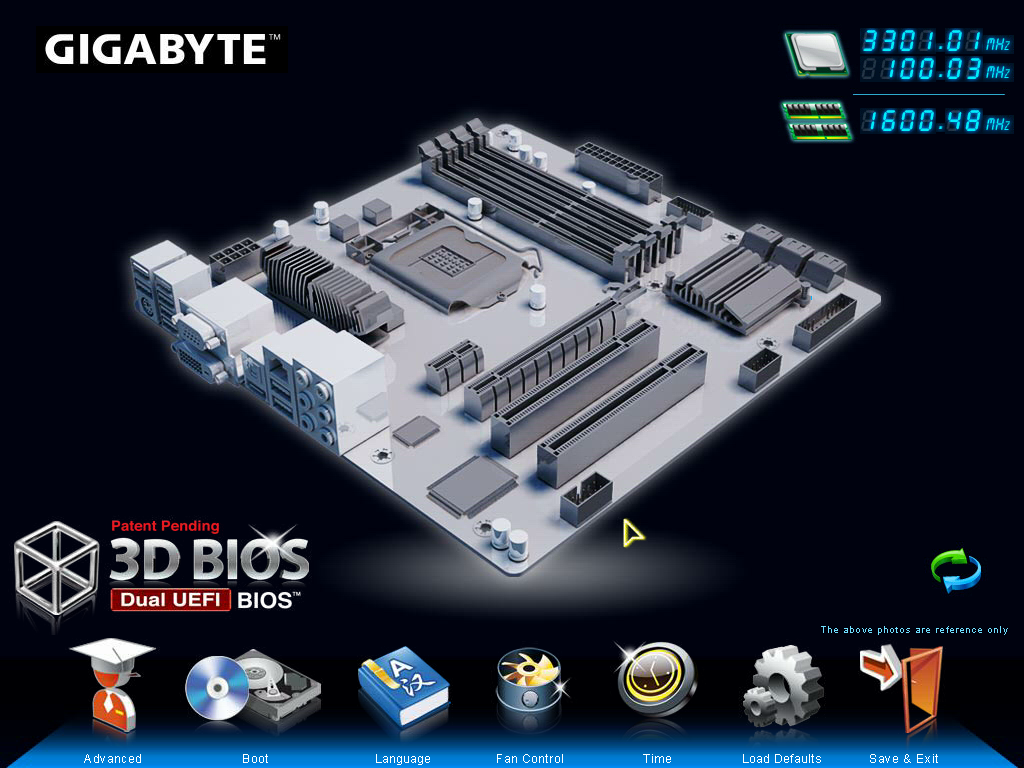
The initial release was slow, bulky, and along with many other reviewers, was baffled by the naming system. Gigabyte called it their ‘3D BIOS Technology’, using 3D to mean 3-dimensional. The majority of users would have been exposed to a 3D environment on their computers, either through games or design. But Gigabyte had construed this terminology to apply to images drawn at an oblique angle. There was noting three-dimensional about it – the user could not navigate from foreground to background (anyone remember playing Tombi/Tomba on PSX?). All we had was an oblique image with clickable parts that gave smaller versions of the advanced BIOS functionality. This 3D BIOS aside, due to the slow and young BIOS which had not had time to develop, we struggled to deal with odd decisions regarding menu allocation (overclocking voltages were several clicks away from the CPU speed adjustment) or fan control terminology. At the time, and since, I made a raft of criticisms and suggestions.
Fast forward almost a year and several things have changed for the better. We can now navigate the Gigabyte BIOS at speed, which is most important. Boot times on certain models can be aggressive, and Gigabyte is opening up more options in the BIOS than before. I love the fact that we can screenshot the BIOS rather than having to photograph the screen (despite some reviewers still miss this feature and get the camera out). We are still stuck with this 3D terminology though, and some odd fan terminology. I have explained to Gigabyte that normal users do not work in PWM values / °C, so I am hoping that will change in the future.
Gigabyte H77N-WiFi BIOS
For the H77N-WiFi explicitly, the first odd feature to point out should be the ‘3D’ image used at the front head of the BIOS. Despite the disclaimer that ‘the above photo is for reference only’ we would expect the motherboard to resemble somewhat like the board at hand. For the H77N-WiFi though, we get an image of a micro-ATX board, with the chipset and socket area in different places. Is it that time consuming to put in a mITX image? I fear that this was just an oversight with this BIOS version and should be corrected in the future.
My usual gripes with BIOSes are going to be expressed again, because very few manufacturers seem to take these hints on board (maybe I am not shouting loud enough). Nowhere on this front screen does it tell the user (or system builder, debugger) at least the two main things that should be present on the front screen of ALL BIOSes – the model of the motherboard and the CPU present. This information should be in the face of the user when we enter the BIOS so mistakes are not made with the system we are working with. Alongside this I would also want the current speed of the processor, memory installed (along with module size and memory speed), CPU temperature, chipset temperature, important voltages and fan speeds. If we count the first two requests as the primary detail and the others as secondary detail, what is to stop the primary details being shown on the front screen and the secondary details being shown in a pull out menu when the mouse drifts to the side or corner (like in Windows 8). This is a graphical BIOS – a metaphorical playground to make the experience of owning the product come to life and exciting. I see very few motherboard manufacturers taking advantage of this to the full.
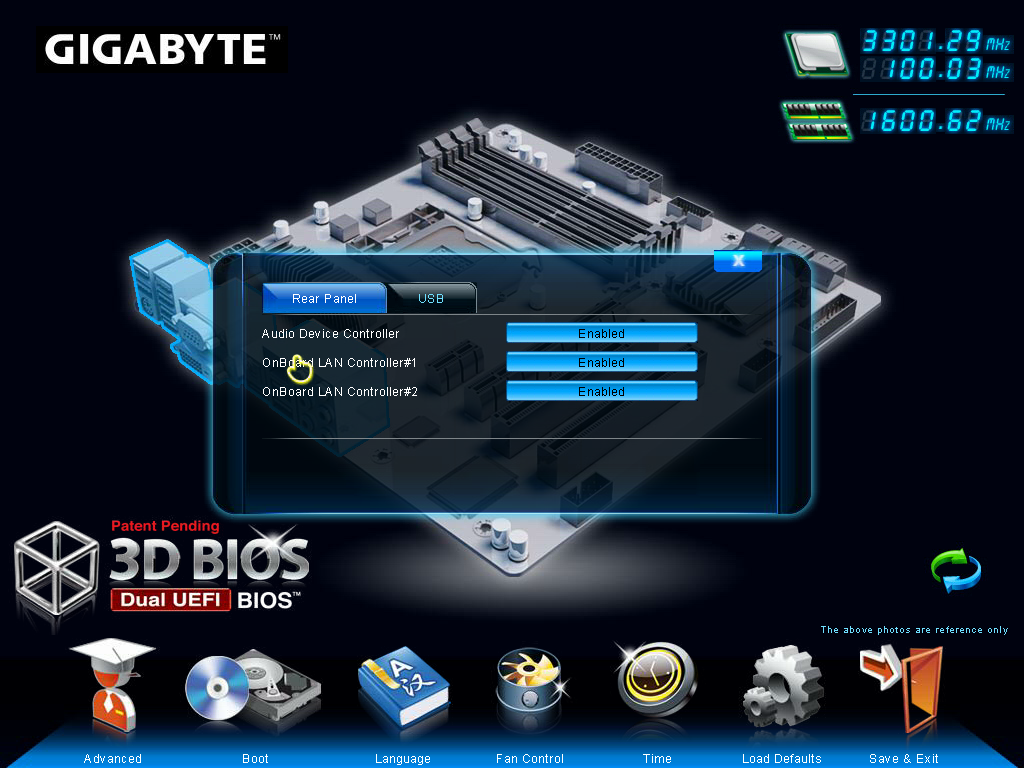
Despite this, the functionality of the H77N-WiFi BIOS is as follows. The main screen gives an image of a generic BIOS of which various areas of the motherboard can be highlighted and clicked, such as the CPU, the memory, the chipset, the SATA ports, the IO panel and so on. When clicked, each area will bring up a limited set of options pertaining to that motherboard section – the rear panel section for example will give options to enable/disable audio and LAN ports as well as USB legacy support. Also available are options to adjust the boot order, change the language, or deal with fan controls. It would be ideal if the areas on the motherboard, when highlighted, gave a small indication of what they are – asking a family member to ‘select the SATA ports’ on the BIOS over the phone is a bit useless if they do not know what a SATA port is. These are small little adjustments that could be made to make the experience smoother.
The bulk of the options are found in the Advanced menu. This opens up into a typical modern day graphical BIOS interface where we have the main options along the top, with options and sub-menus in the main area. The first advanced screen is the ’MIT’ (Motherboard Intelligent Tweaker), where we actually get some details regarding what is onboard – off the bat we have the BIOS version, CPU Frequency, Memory Size and frequency, CPU temperature and some voltages. All that information (along with the motherboard model more importantly) should be in the 3D menu previous.
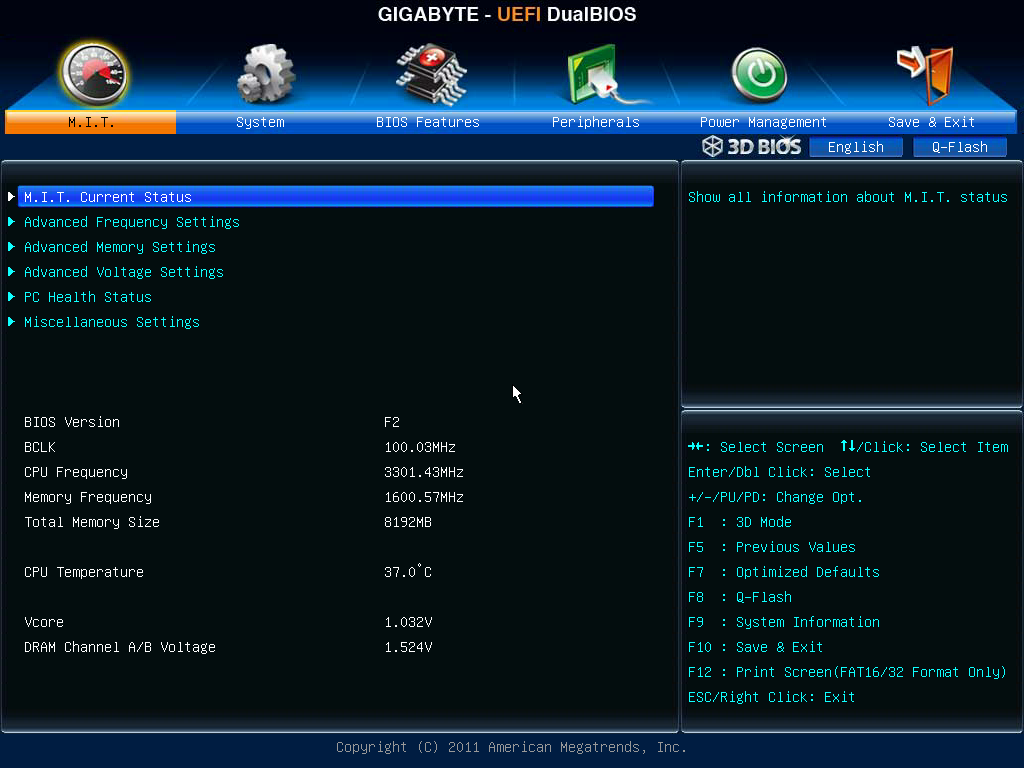
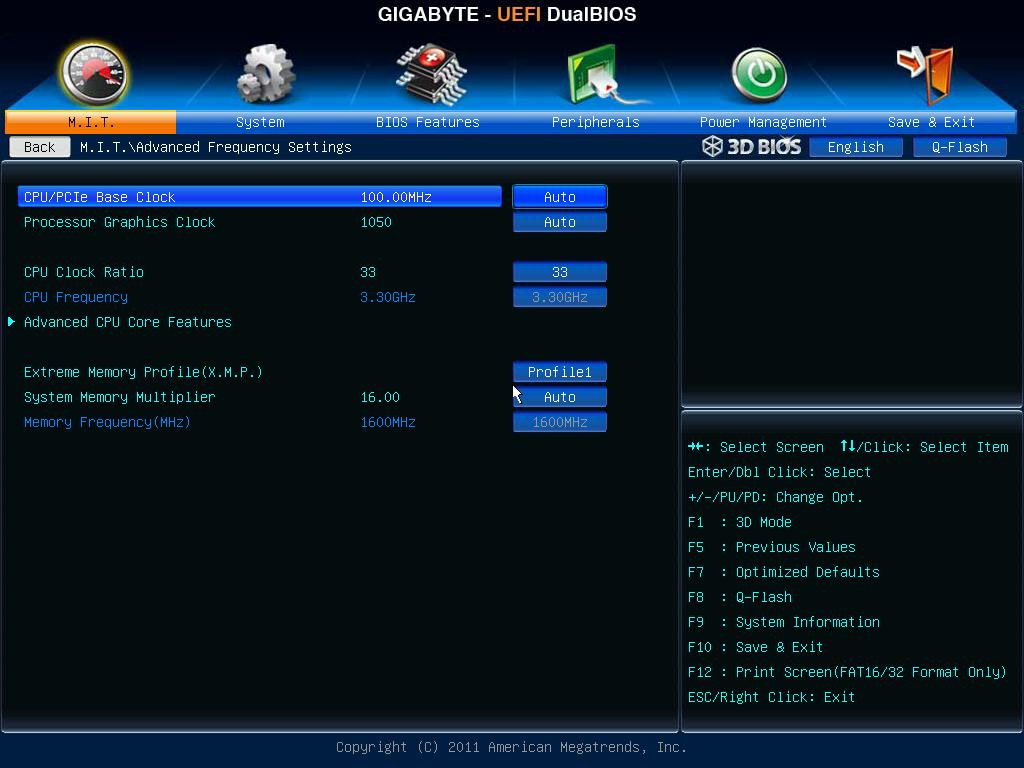
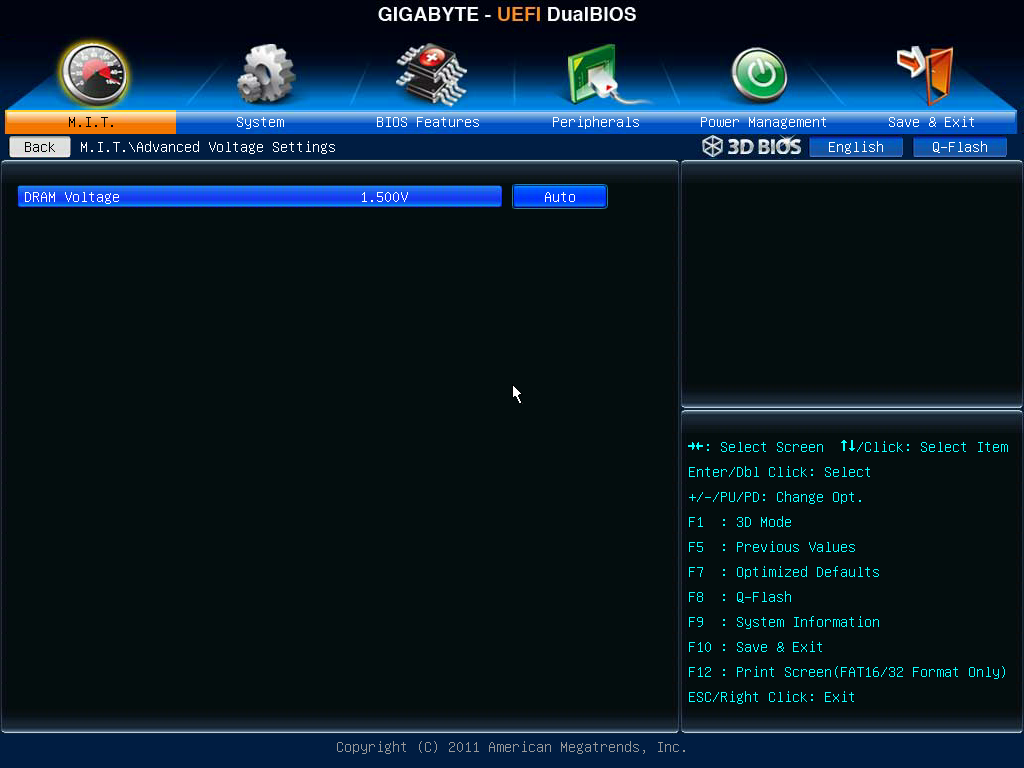
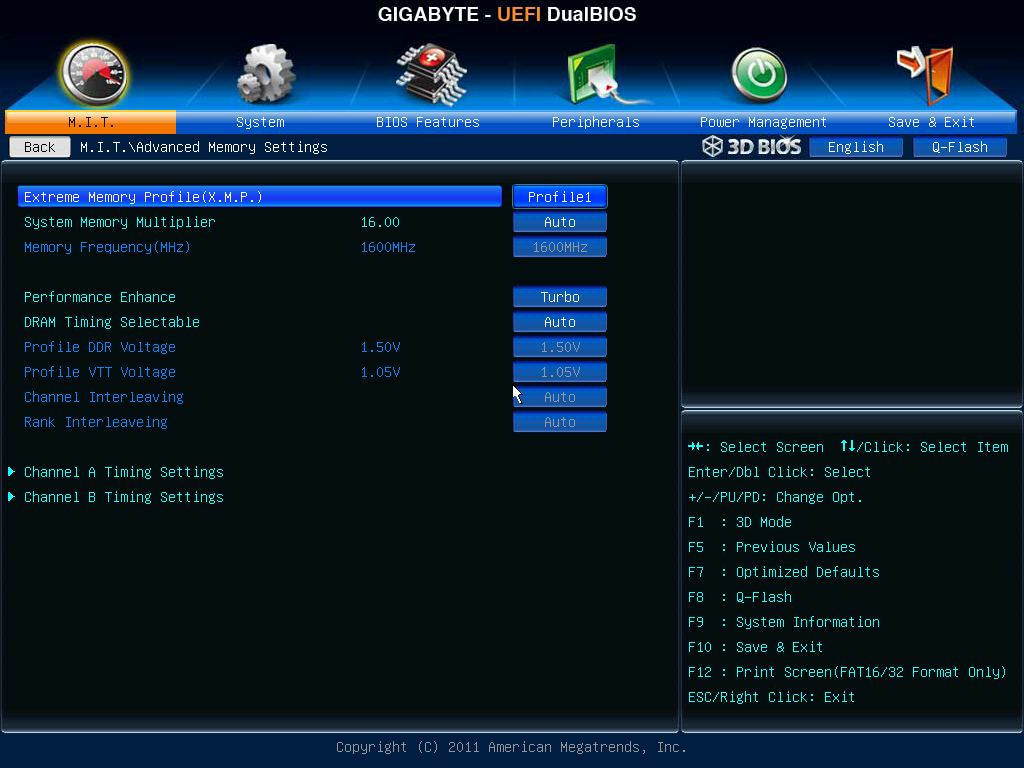
Various sub-menus can be spawned from the MIT menu. We can select ‘Current Status’ to give a more detailed rundown of the CPU and memory; the frequency settings which can adjust the speed of the processor (only below the rated speed on an H77 by multiplier but BCLK can be adjusted up), memory (max 1600 MHz) and IGP. We also have the advanced memory settings sub-menu where XMP and sub-timing adjustments can be made. The advanced voltage settings offer only the memory voltage to adjust, so do note that the H77N-WiFi does not allow down-clocking. Finally the ‘PC Health’ sub-menu which gives voltages, temperatures, fan speeds, and the fan speed control which gives options in PWM values / °C.
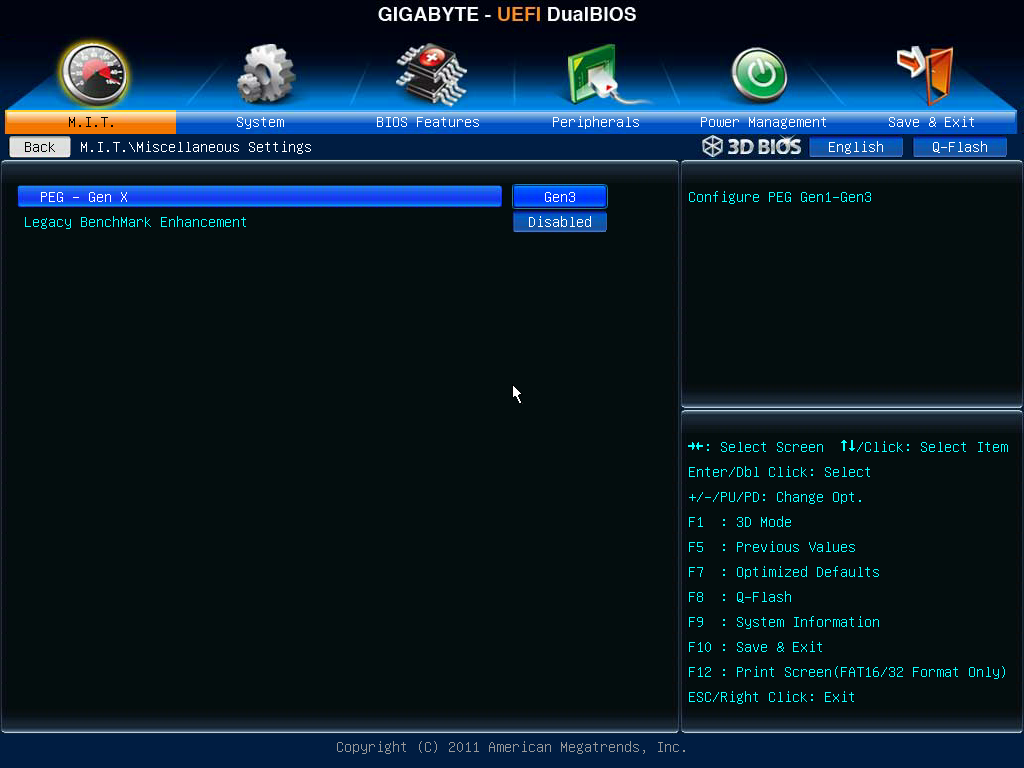
An important menu to consider is the final sub-menu ‘Miscellaneous’ settings. Here we have two options – one for legacy benchmark enhancement (an odd option to include for overclockers on a non-overclocking motherboard) and the other to adjust the PCIe slot bandwidth. When the system was left on auto, I had trouble getting any of my graphics cards to run at the full 16x lanes – I initially thought it was some clever down clocking, but it never seemed to come back up and use the full 16 lanes at PCIe 3.0 for a 7970 for example. By navigating to this menu and adjusting the option to Gen3, the graphics sub-system never faulted and we got accurate benchmark results. If this is a BIOS issue rather than individual issues, I hope it is fixed after F2.
Elsewhere in the BIOS is our standard array of BIOS Features (Boot options, Logo on Boot), Peripherals (to enable controllers, change SATA mode), and boot override system.


Gigabyte H77N-WiFi In The Box
Gigabyte packages are very black and white in their offerings – either it contains the ‘bare minimum’ or there is a lot for your cash. We have seen the former plenty of times, especially on low end or sub $150 models, and the latter on examples such as the Z77X-UD5H and G1.Sniper 3. The Gigabyte H77N-WiFi is currently e-tailing at $120, putting it square at the low end of the full size Z77 market. For this, we have the following:
Driver DVD
User Manual
WiFi DVD
Rear IO Shield
Two SATA Cables
Two Antenna

In the grand scheme of things, it was probably a stretch to have expected anything beyond this in a mITX setup. Perhaps another couple of SATA cables would have sweetened the deal, an extension cable for that oddly placed 4-pin CPU power connector, or a molex-to-SATA power connector or two.
Gigabyte H77N-WiFi Software
I started reviewing Gigabyte motherboards in January 2011, and since then I have had at least 10-12 pass through my fingertips and there is one constant throughout – the cornerstone included software package. Namely I am talking about EasyTune6.
EasyTune6
EasyTune6 has had a hard life. It shows sign of age, and shows sign of a design team that during its conception did not understand how important included software may be to the system as a whole. Not least of all that it seems to interfere in our testing (see DPC Latency testing later in the review).
On a Z77 product, EasyTune6 is the hub that controls the preset automatic overclocking options, as well as the manual overclocking options. That functionality is practically gone in H77 – all we can control is the BCLK, memory strap for next boot, and memory voltage. This leaves EasyTune6 with the other options – displaying information such as the CPU, the Memory, the GPU, the HW Monitor, and the fan options.
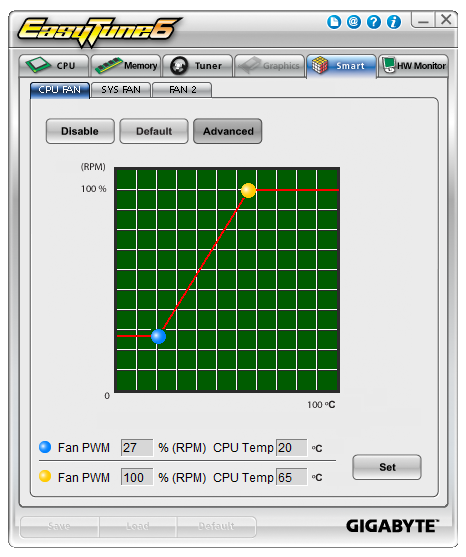
The fan element of the software allows a user to determine a single gradient for each set of controllable fan headers. This is basic fan functionality indicative on a lack of imagination – the system can output whatever % value to these fans, and they have inputs of CPU temperature, system temperature, and a software backbone. It should not be too difficult to envisage software that manages a multipoint system with hysteresis.
@BIOS
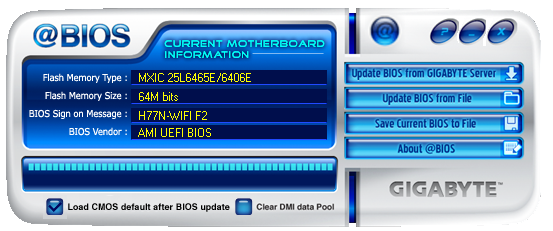
The other element consistent with all the other Gigabyte motherboard reviews has been @BIOS. This software is a simple BIOS update tool for the operating system designed to search the cloud for the latest BIOS version, download it and update the system. I should point out that I have found times when the latest BIOS version the website is actually newer, but users can download this and use @BIOS to update the system. @BIOS also comes in handy when Gigabyte to large changes that cause the BIOS update route through the BIOS to fail, and thus @BIOS must be used. There are horror stories about updating a BIOS in the operating system (I prefer to update through the BIOS if I can), but I have not had any issues with @BIOS to date.
Realtek LAN Optimizer
While not part of the Gigabyte software package, the Realtek LAN Optimizer is included with the Driver DVD. The LAN Optimizer allows users to prioritize certain programs over others for network traffic. This can either be done on an individual level, or as a ‘mode’, such as for gaming or web-browsing. Essentially this is to make sure that while a user is downloading a large amount of data, the bandwidth is not choked for normal activities.
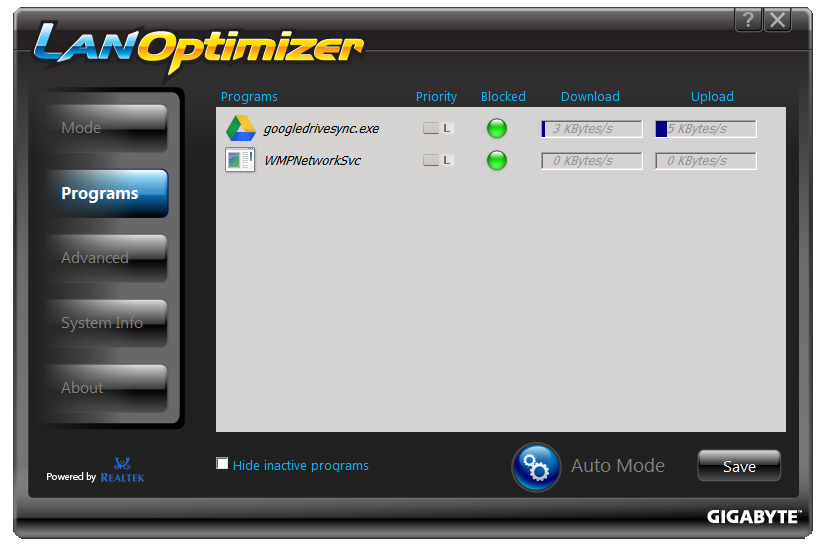
This software is essentially a poor mans cFos. cFos is a great software based LAN utility, available to buy or license, and is included in other motherboard manufacturers software packages. Gigabyte has chosen not to use this route, as their high end motherboards come with Atheros Killer NICs and their appropriate software.


Also available for download is Gigabyte USB Blocker, which allows administrators to block certain types of devices from being used in the system.
Gigabyte H77N-WiFi Overclocking
‘What so you mean, overclocking?’ I hear you cry. This is a H77 board after all – we cannot adjust the CPU multiplier above the CPU base, and we are restricted to DDR3-1600 MHz by the BIOS. But we can adjust the BCLK, and Ivy Bridge is usually good for 105-108 MHz, but this is highly dependant on the processor and the other sub-systems on board. Normally in my overclocking parts to these reviews I do not push BCLK, but the majority of Z77 motherboards can achieve around 109 MHz except one or two that fail to go beyond 104 MHz.
But a user should not honestly buy a H77 for overclocking. Some users will be interested in underclocking though, and the H77N-WiFi is not the best for underclocking. To start, while we can adjust the CPU multiplier down from its original value, we have no control over the CPU voltage. Yes, that is right – no CPU voltage control. For all intents and purposes, the F2 BIOS restricts the user to the VID voltage and idle states. I do hope that in a later BIOS that the voltage can be adjusted.
Many thanks to...
We must thank the following companies for kindly donating hardware for our test bed:
OCZ for donating the SSDs
Micron for donating our SATA testing SSD
G.Skill for donating our memory kits
ASUS for donating AMD GPUs and some IO Testing kit
ECS for donating NVIDIA GPUs
Gigabyte for donating the i3-3225 used for comparison
Rosewill for donating the Power Supply
Test Setup
| Test Bed | |
| Processor |
Intel Core i3-3225 @ 3.3 GHz 2 Cores, 4 Threads |
| Motherboards | Gigabyte H77N-WiFi |
| Cooling | Thermalright TRUE Copper |
| Power Supply | Rosewill SilentNight 500W |
| Memory | GSkill RipjawsX 2x4 GB DDR3-1600 9-9-9 |
| Memory Settings | XMP |
| Video Cards |
ASUS HD7970 3GB ECS GTX 580 1536MB |
| Video Drivers |
Catalyst 12.3 NVIDIA Drivers 296.10 WHQL |
| Hard Drive | OCZ Vertex 3 240GB |
| Optical Drive | LG GH22NS50 |
| Case | Open Test Bed - CoolerMaster Lab V1.0 |
| Operating System | Windows 7 64-bit |
| SATA Testing | OCZ Vertex 3 128GB |
| USB 2/3 Testing | OCZ Vertex 3 240GB with SATA->USB Adaptor |
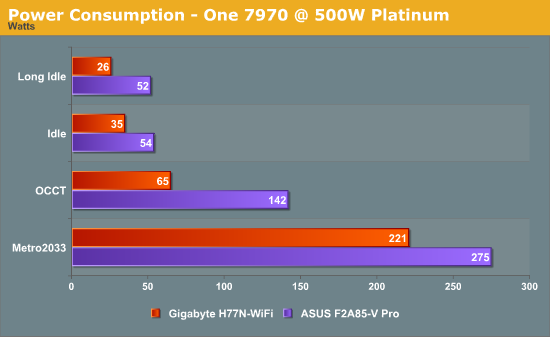
Power Consumption
Power consumption was tested on the system as a whole with a wall meter connected to a Rosewill 500W 80PLUS Platinum SilentNight power supply. As I am in the UK on a 230-240 V supply, leads to ~75% efficiency at low loads, and 90%+ efficiency between 20% and 100% loading. This method of power reading allows us to compare the power management of the UEFI and the board to supply components with power under load, and includes typical PSU losses due to efficiency. These are the real world values that consumers may expect from a typical system (minus the monitor) using this motherboard.
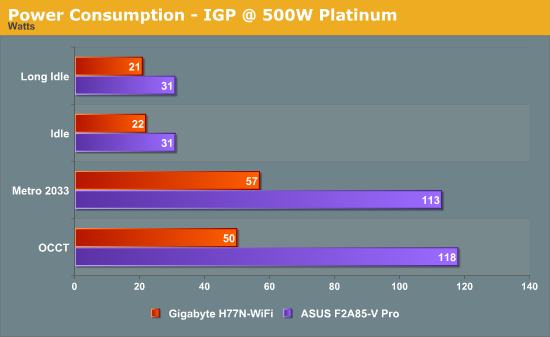
Using the i3-3225 processor gives an amazing idle power usage – 21 W on IGP. Even with a 500W Platinum power supply, 21 W is still on the very low end of efficiency. I wouldn’t be surprised if the actual draw was more like 14-16 W.
POST Time
Different motherboards have different POST sequences before an operating system is initialized. A lot of this is dependent on the board itself, and POST boot time is determined by the controllers on board (and the sequence of how those extras are organized). As part of our testing, we are now going to look at the POST Boot Time - this is the time from pressing the ON button on the computer to when Windows starts loading. (We discount Windows loading as it is highly variable given Windows specific features.) These results are subject to human error, so please allow +/- 1 second in these results.
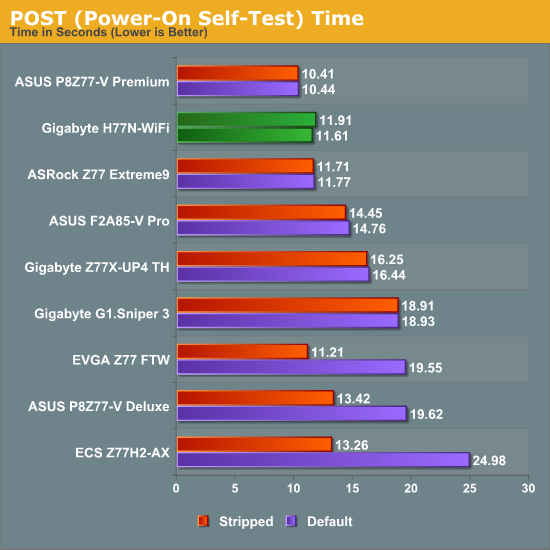
With the launch of Windows 8, most of the motherboard manufacturers are scrambling to update their BIOSes to take advantage of some of the Windows 8 features. This has resulted in reduced boot times – manufacturers that were taking 18 seconds to POST are down to 12 or below. I have been quoted that with the right combination of hardware and BIOS options, some setups can be in the operating system in 2-4 seconds. Nevertheless it also has a knock on affect for other operating systems – the Gigabyte H77N-WiFi is able to boot in a highly respectable 11.61 seconds with a 7970 attached.
Rightmark Audio Analyzer 6.2.5
In part due to reader requests, we are pleased to include Rightmark Audio Analyzer results in our benchmark suite. The premise behind Rightmark:AA is to test the input and output of the audio system to determine noise levels, range, harmonic distortion, stereo crosstalk and so forth. Rightmark:AA should indicate how well the sound system is built and isolated from electrical interference (either internally or externally). For this test we connect the Line Out to the Line In using a short six inch 3.5mm to 3.5mm high-quality jack, turn the OS volume to 100%, and run the Rightmark default test suite at 48 kHz, 96 kHz and 192 kHz. The results are given both numerical ratings and word ratings from ‘Very Poor’ to ‘Excellent’. We grade this test by assigning each of the word ratings a value from 1-6, and the final result is the sum of these ratings, and the score should end up between 8 and 48.
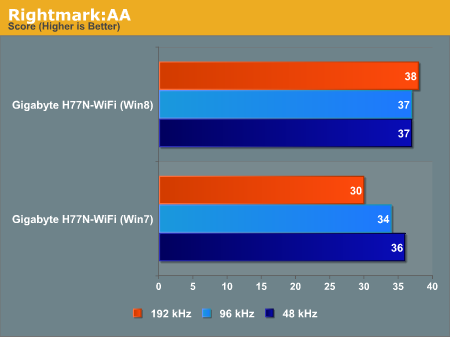
The Gigabyte board is our first motherboard on our test bed to go through Rightmark, so while we do not have any comparative numbers yet, but we can draw conclusions. In our testing, the Windows 7 performance rises with bit-rate, whereas the Windows 8 driver gives constant performance throughout. The dynamic range of the Realtek ALC892 is rated at 110 dBA ideal, but losses due to design come through – in this case the Gigabyte tops out at 86.2 dBA at 48 kHz.
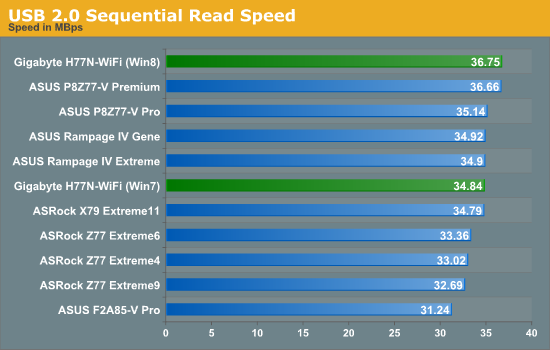
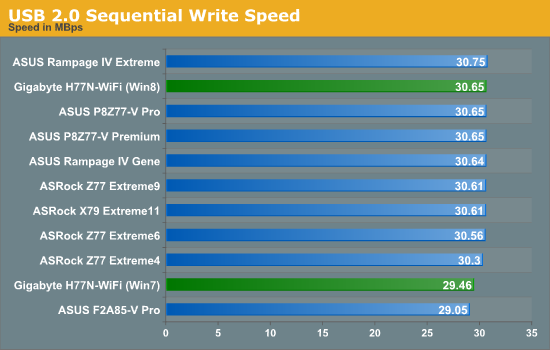
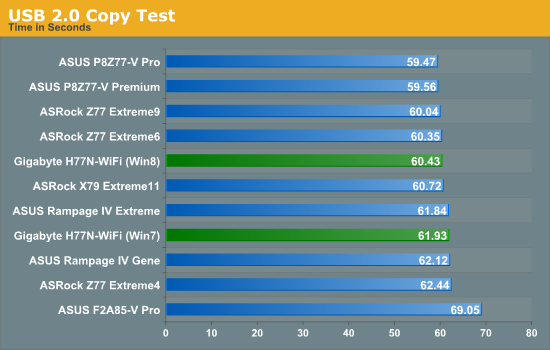
USB Speed
For this benchmark, we run CrystalDiskMark to determine the ideal sequential read and write speeds for the USB port using our 240 GB OCZ Vertex3 SSD with a SATA 6 Gbps to USB 3.0 converter. Then we transfer a set size of files from the SSD to the USB drive using DiskBench, which monitors the time taken to transfer. The files transferred are a 1.52 GB set of 2867 files across 320 folders – 95% of these files are small typical website files, and the rest (90% of the size) are the videos used in the Sorenson Squeeze test.
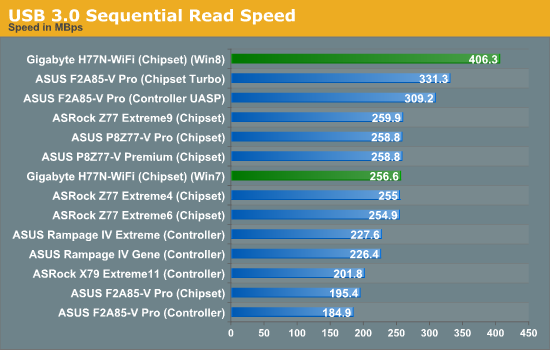
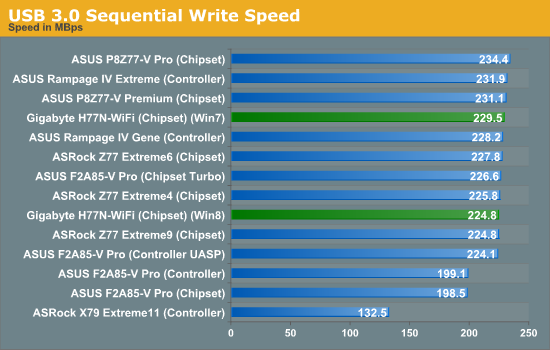
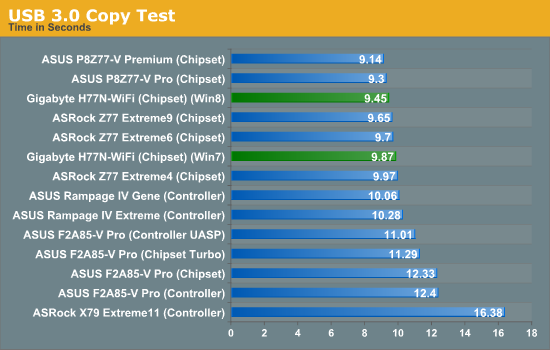
At some point in the future we will be adjusting our testing to Windows 8, which will be able to take advantage of the UASP protocol for USB 3.0 transfers. In our performance review of Windows 8 this manifested itself in an increase in sequential USB 3.0 read speed from 256.6 Mbps to 406.30 Mbps, which meant a 4% quicker USB copy test as writing was not similarly affected.
DPC Latency
Deferred Procedure Call latency is a way in which Windows handles interrupt servicing. In order to wait for a processor to acknowledge the request, the system will queue all interrupt requests by priority. Critical interrupts will be handled as soon as possible, whereas lesser priority requests, such as audio, will be further down the line. So if the audio device requires data, it will have to wait until the request is processed before the buffer is filled. If the device drivers of higher priority components in a system are poorly implemented, this can cause delays in request scheduling and process time, resulting in an empty audio buffer – this leads to characteristic audible pauses, pops and clicks. Having a bigger buffer and correctly implemented system drivers obviously helps in this regard. The DPC latency checker measures how much time is processing DPCs from driver invocation – the lower the value will result in better audio transfer at smaller buffer sizes. Results are measured in microseconds and taken as the peak latency while cycling through a series of short HD videos - under 500 microseconds usually gets the green light, but the lower the better.
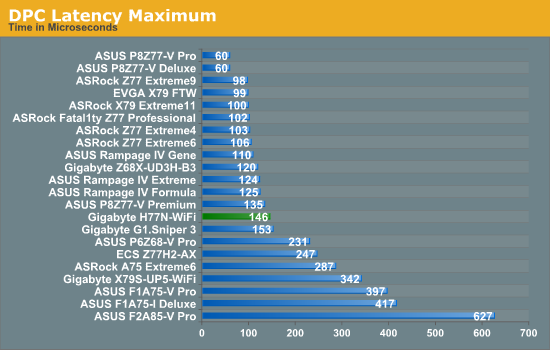
The DPC Latency test is starting to become one where we have two different types of motherboard manufacturer. The top tier manufacturers offer better software with their products, often with monitoring tools as part of the package in order to monitor overclocks or fan speeds. These monitoring tools inject high priority requests in the system on a regular basis (every 1-3 seconds), delaying other requests such as those for audio, causing spikes in DPC Latency which could lead to distortion or other audio anomalies. Surprisingly manufacturers without these tools do not have these issues. These issues are sometimes fixed via a BIOS update, but even if one board gets updated and fixed, it for some reason does not propagate to future products or the back catalogue. So here we are with the Gigabyte H77N-WiFi, which gives a good sub-200 microsecond result, but unfortunately while EasyTune6 is enabled, this can spike to 32000 microseconds. Ouch.
3D Movement Algorithm Test
The algorithms in 3DPM employ both uniform random number generation or normal distribution random number generation, and vary in various amounts of trigonometric operations, conditional statements, generation and rejection, fused operations, etc. The benchmark runs through six algorithms for a specified number of particles and steps, and calculates the speed of each algorithm, then sums them all for a final score. This is an example of a real world situation that a computational scientist may find themselves in, rather than a pure synthetic benchmark. The benchmark is also parallel between particles simulated, and we test the single thread performance as well as the multi-threaded performance.
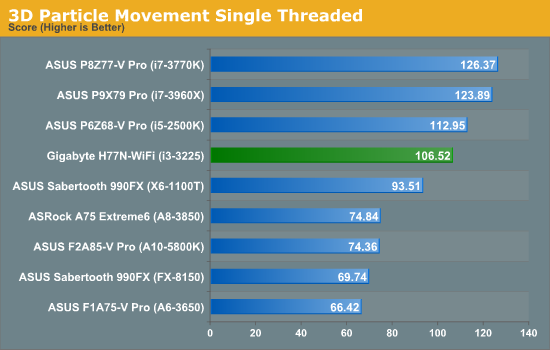
With our main comparison point being the dual module Trinity A10-5800K processor used in the F2A85-V Pro, we can safely say that single threaded performance on the Intel side is second to none – even when comparing a 3.3 GHz Intel part to a 4.2 GHz AMD part in a full FP workload.
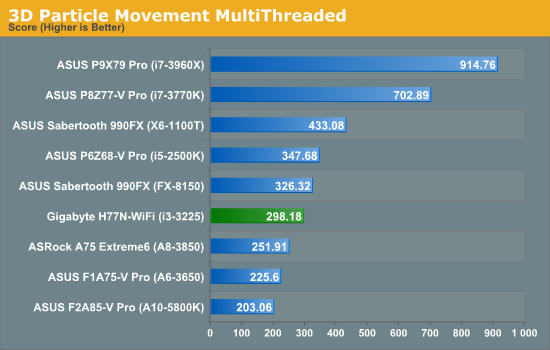
When it comes to multithreading, due to the FP nature of the benchmark, the A10-5800K is essentially dual core due to its FP unit allocation. Thus comparing the i3-3225 with Hyperthreading to the A10-5800K gives a 50% bonus to the Intel processor.
WinRAR x64 3.93 - link
With 64-bit WinRAR, we compress the set of files used in the USB speed tests. WinRAR x64 3.93 attempts to use multithreading when possible, and provides as a good test for when a system has variable threaded load. If a system has multiple speeds to invoke at different loading, the switching between those speeds will determine how well the system will do.
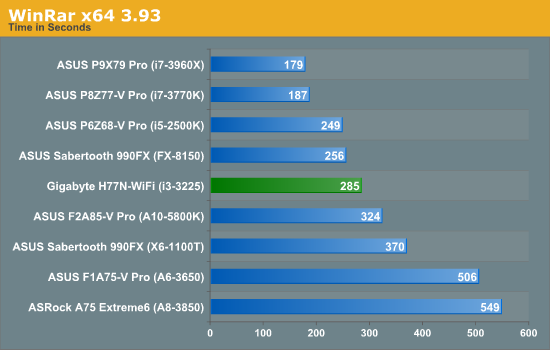
It should be noted that WinRAR does like faster memory – thus the comparison points here show an A10-5800K @ DDR3-2400 10-12-12 against an i3-3225 @ DDR3-1600 9-9-9. Despite the Intel chip having a CPU and memory disadvantage, it still manages to perform our compression test 39 seconds quicker than the AMD chip.
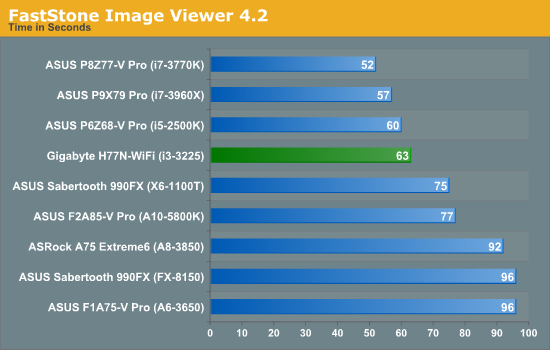
FastStone Image Viewer 4.2 - link
FastStone Image Viewer is a free piece of software I have been using for quite a few years now. It allows quick viewing of flat images, as well as resizing, changing color depth, adding simple text or simple filters. It also has a bulk image conversion tool, which we use here. The software currently operates only in single-thread mode, which should change in later versions of the software. For this test, we convert a series of 170 files, of various resolutions, dimensions and types (of a total size of 163MB), all to the .gif format of 640x480 dimensions.
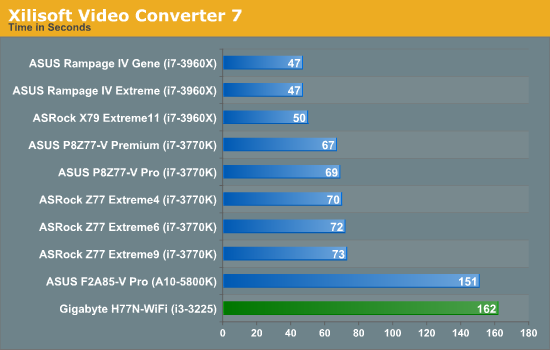
Xilisoft Video Converter
With XVC, users can convert any type of normal video to any compatible format for smartphones, tablets and other devices. By default, it uses all available threads on the system, and in the presence of appropriate graphics cards, can use CUDA for NVIDIA GPUs as well as AMD APP for AMD GPUs. For this test, we use a set of 32 HD videos, each lasting 30 seconds, and convert them from 1080p to an iPod H.264 video format using just the CPU. The time taken to convert these videos gives us our result.
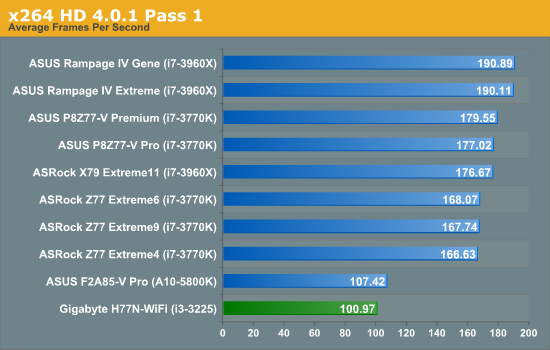
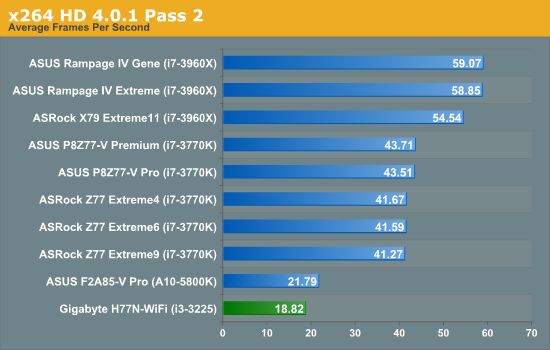
x264 HD Benchmark
The x264 HD Benchmark uses a common HD encoding tool to process an HD MPEG2 source at 1280x720 at 3963 Kbps. This test represents a standardized result which can be compared across other reviews, and is dependant on both CPU power and memory speed. The benchmark performs a 2-pass encode, and the results shown are the average of each pass performed four times.
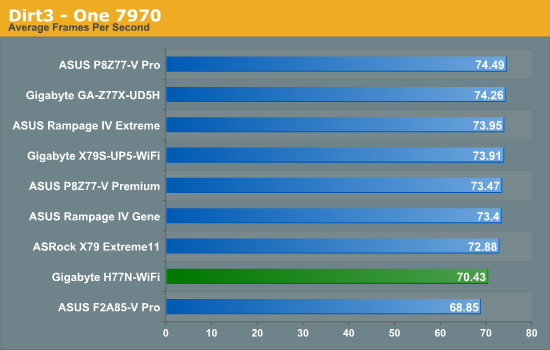
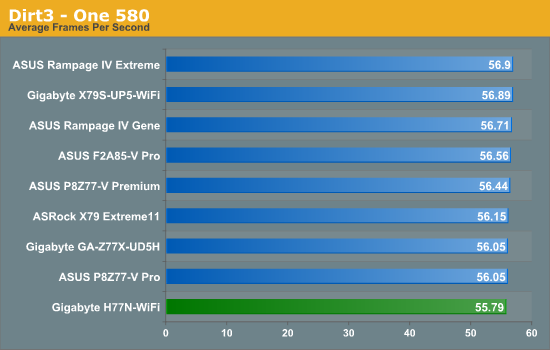
Dirt 3
Dirt 3 is a rallying video game and the third in the Dirt series of the Colin McRae Rally series, developed and published by Codemasters. Using the in game benchmark, Dirt 3 is run at 2560x1440 with full graphical settings. Results are reported as the average frame rate across four runs.
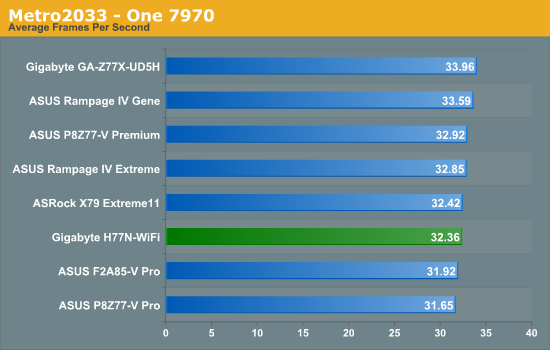
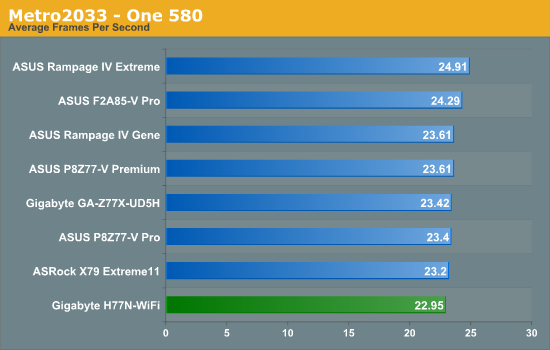
Metro2033
Metro2033 is a DX11 benchmark that challenges every system that tries to run it at any high-end settings. Developed by 4A Games and released in March 2010, we use the inbuilt DirectX 11 Frontline benchmark to test the hardware at 2560x1440 with full graphical settings. Results are given as the average frame rate from 10 runs.
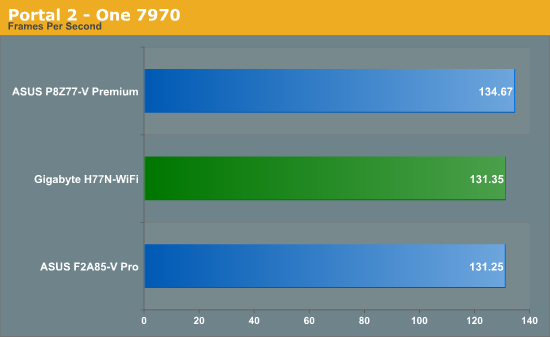
Portal 2
A stalwart of the Source engine, Portal 2 is the big hit of 2011 following on from the original award-winning Portal. In our testing suite, Portal 2 performance should be indicative of CS:GO performance to a certain extent. Here we test Portal 2 at 2560x1440 with maximum graphical setting using the same timedemo used in our GPU and notebook reviews.
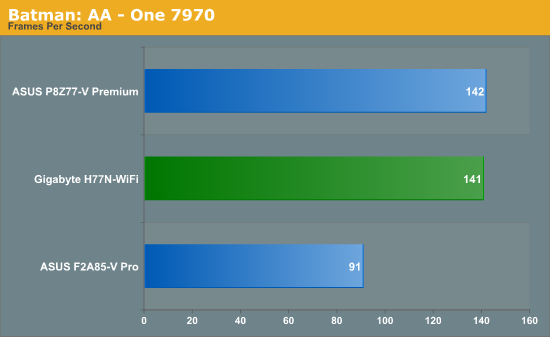
Batman Arkham Asylum
Made in 2009, Batman:AA uses the Unreal Engine 3 to create what was called “the Most Critically Acclaimed Superhero Game Ever”, awarded in the Guinness World Record books with an average score of 91.67 from reviewers. The game boasts several awards including a BAFTA. Here we use the in-game benchmark while at the highest specification settings without PhysX at 2560x1440. Results are reported to the nearest FPS, and as such we take 4 runs and take the average value of the final three, as the first result is sometimes +33% more than normal.
Design of a product is a key part in being able to sell it with positive results. This is why the Apple vs. Samsung case is so big – design wins like to propagate to competitors and the original designers want to hold onto their design as much as possible. We are not going to see anything like Apple vs. Samsung in the motherboard industry, but it would be interesting if that were the case.
But the point remains – as users, we want plenty of design wins to come from all sides. So what happens if a company launches a product with great gusto, but it acts more like a design flop? Is there oversight in the design from the manufacturer, or have other departments apart from design chipped in with their opinion. Ideally some of the features should be designed by market research, rather than by micro-management. Then again, it is also dependent on how the market research is carried out – choosing several PC enthusiasts and asking their opinion is not proper and methodical market research.
By the nature of being a technology reviewer, I am also a critic. I never mean my criticism to be rude, and always aim to provide reasoning and future suggestions about what I would like to happen. Thus after re-reading through this review, I am slightly taken aback by my level of criticism geared towards motherboard design. There are some odd design choices from the H77N-WiFi, such as the CPU/chipset orientation, the 4-pin CPU power connector, combining dual LAN with a WiFi module, no voltage options. But there are design wins – dual HDMI and DVI-I being the big one. There is also scope to change design – moving certain features to the rear may be a possibility as seen on other motherboards.
When I test a motherboard, I have an open test bed to allow cables to go where they please. This is normally oriented for ATX designs, where connectors are often in regular places. I had to move this around somewhat for the Gigabyte H77N-WiFi, dealing with SATA cabling at the top and restrictive CPU cooler options. If these are overlooked on the understanding that when it is in a case there is no cause for concern, then the Gigabyte H77N-WiFi offers a price competitive product.
For $120 we have a mITX board that gives an Intel WiFi Module with WiDi support, dual HDMI outputs combined with a DVI-I, and dual Realtek network ports. Performance wise I would easily suggest this motherboard paired with an i3-3225 to beat the A10-5800K in any single threaded workload you can throw at it. Multi-threaded workloads are more or less benchmark dependant.
I must apologize as I still have a backlog of Z77 mITX boards that I promised I would get through. Please stay tuned for those, as I also have Z77 OC boards and some FM2 coverage coming up. Stay tuned!


